Welcome to the second released version of 2019, TimeTrak 19.2. In this version, we have some exciting new features and settings along with the ability to enable tighter security protocols for your TimeTrak database.
Contents
1. Security Settings
1.1 Two-Factor Authentication
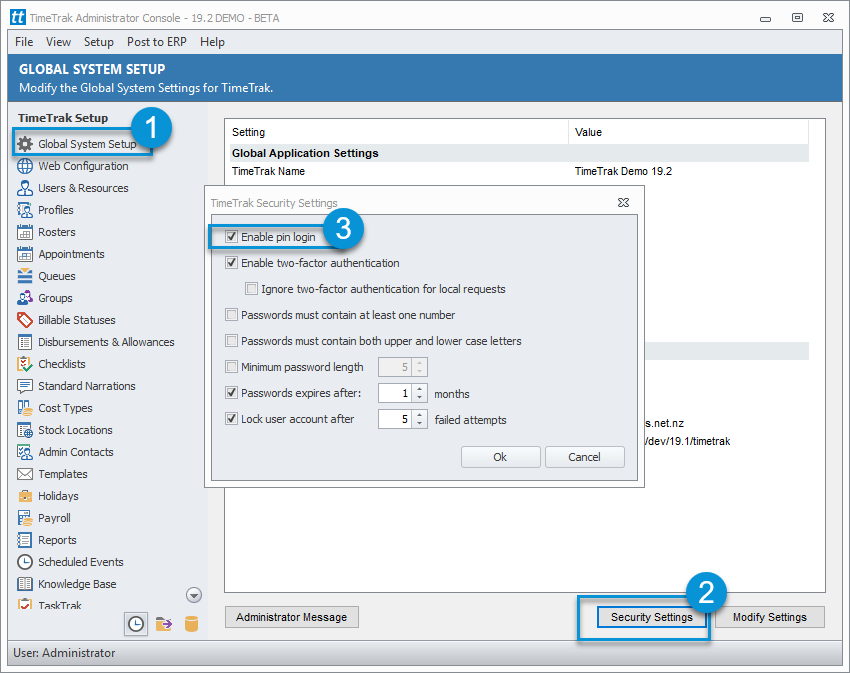
The use of two-factor authentication is more and more common in the bid to make data more secure from potential hacks. As a reflection of this, TimeTrak from version 19.2 onwards supports the use of two-factor authentication. There is now a “Security Settings” section within the TimeTrak Admin Console where two-factor authentication can be enabled as per below:
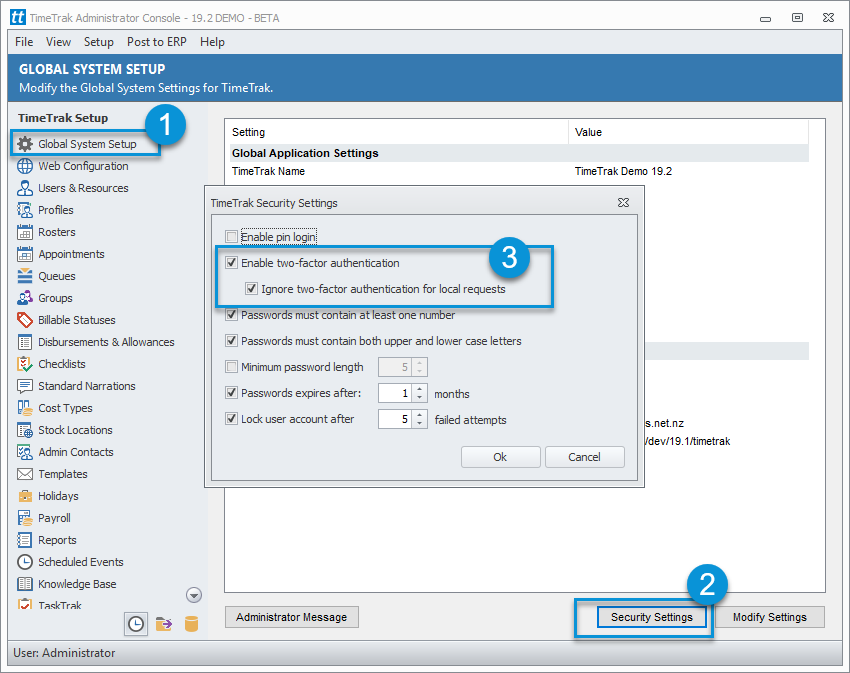
Once this setting is enabled, “Setup Two Factor Authentication” option will be visible in Profile settings in TimeTrak Mobile as per below.
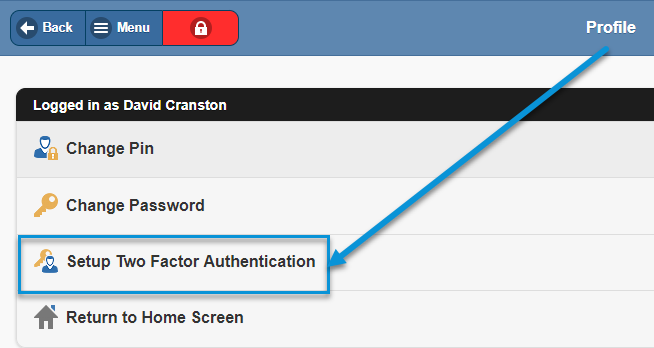
For more information on how to set up two-factor authentication in TimeTrak and how this works, please see our whitepaper.
1.2 TimeTrak Passwords set to expire
Continuing with security improvements within TimeTrak, there is now the ability to set user passwords to expire after a set amount of months.
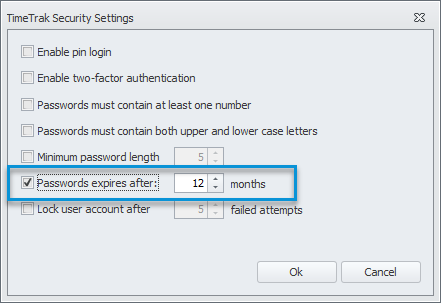
For more information on this, please see our whitepaper.
1.3 Lock user accounts after failed login attempts
Continuing with the security theme, within TimeTrak 19.2, there is the ability to set user accounts to be locked after a set amount of continuous failed password attempts.
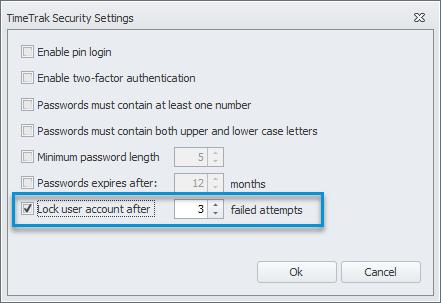
For more information on this, please see our whitepaper.
1.4 Time Out in TimeTrak Mobile
Another useful security improvement within TimeTrak is the ability to lock the Mobile website after a set timeout period. If “Enable Pin login” is enabled on the database as per below:
Then at the profile level, the setting “Lock TimeTrak Mobile screen if idle for more than __” can be enabled with a specified time out period (in the below example 5 minutes).
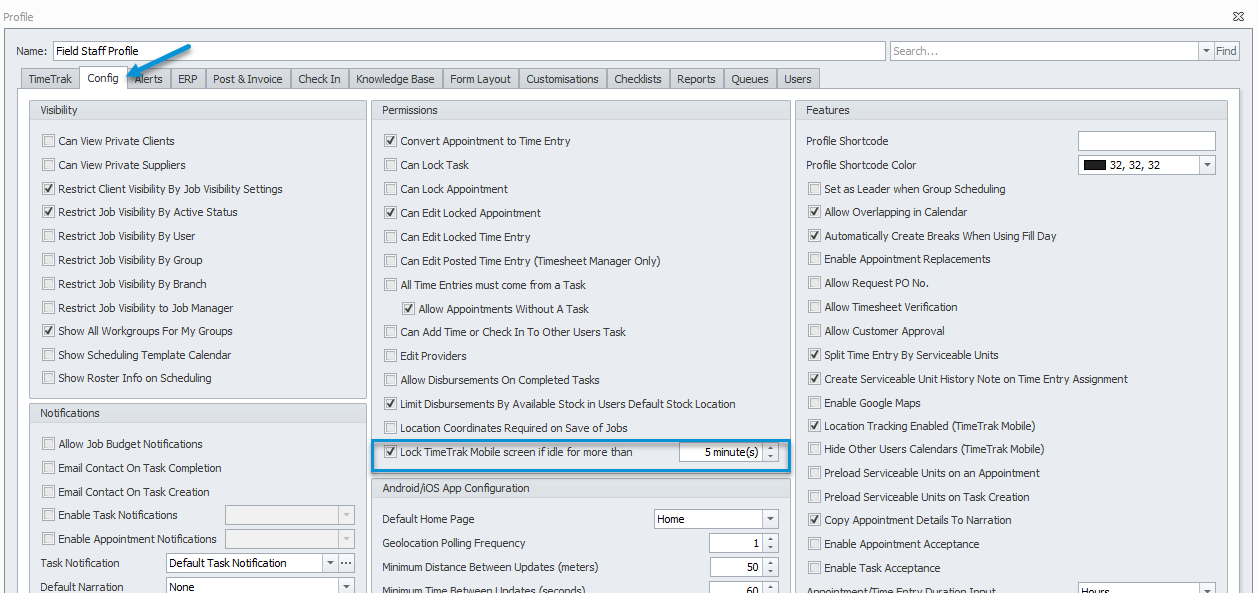
Users against this profile can then login to TimeTrak Mobile using their pin code, once the screen has been idle for more than the specified period (in this example 5 minutes), the user’s session will be “locked” and return to the home screen as per below.
Note: This is great for workshop environments where multiple users are using the same device and often forget to “lock” their session.
1.5 Profile setting visibility and home screen configuration in TimeTrak Mobile
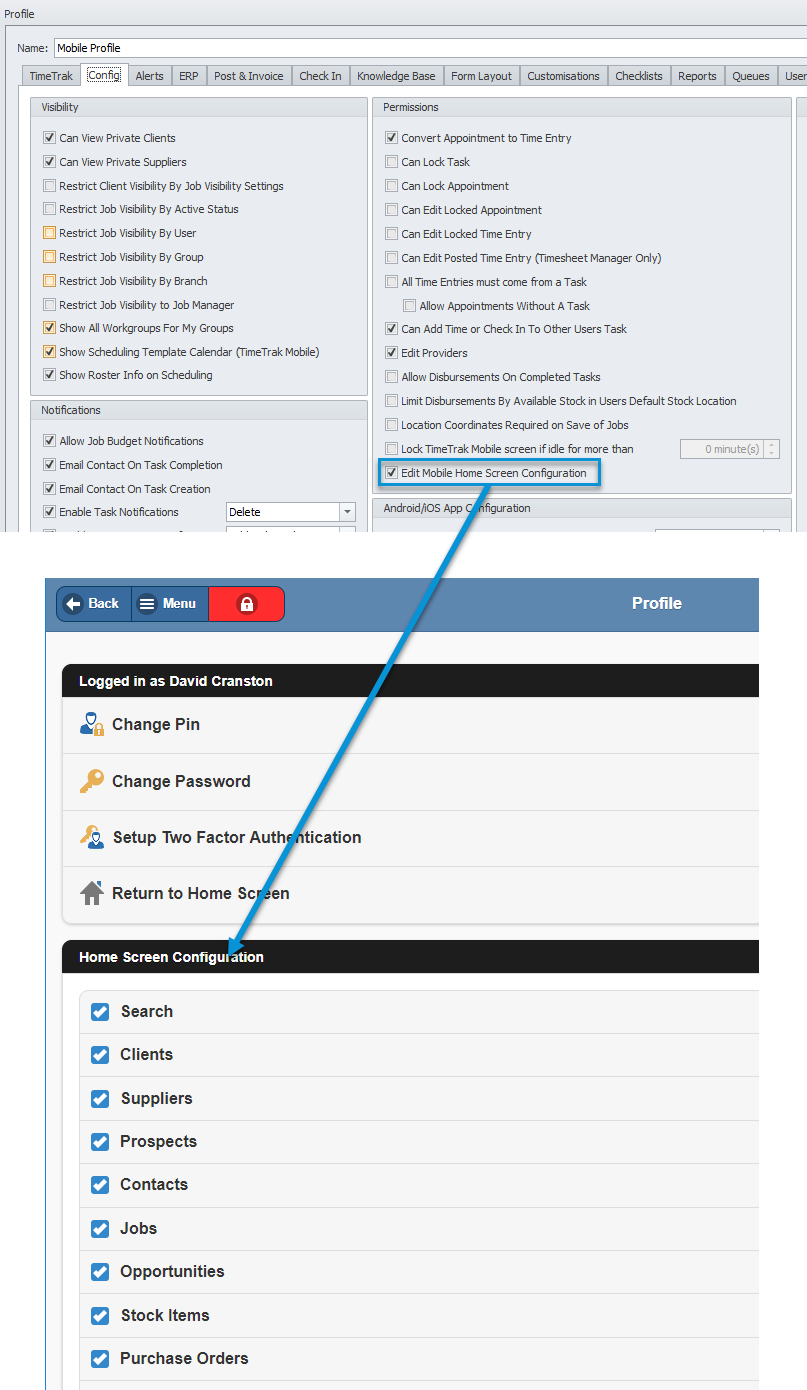
In TimeTrak 19.2, there is the ability to control the visibility of Mobile home screen configuration settings, widgets and user settings. Primary visibility control is available in TimeTrak Admin Console > Profiles as per below.
1.6 Sub Task restriction
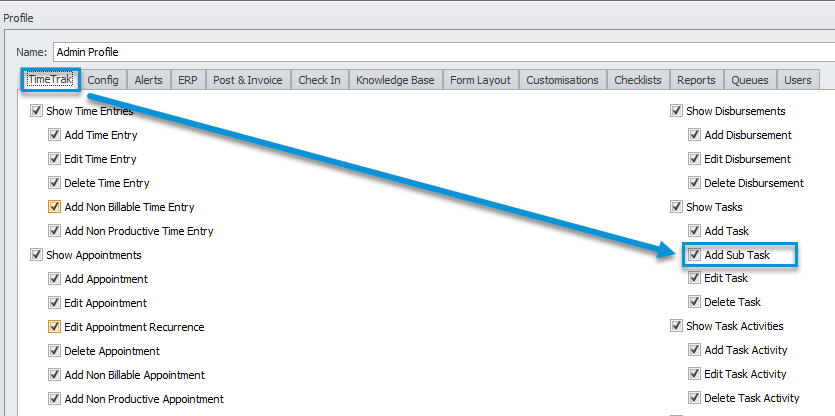
TimeTrak 19.2 introduces the ability to allow or restrict users from adding subtasks. This feature is useful for Jobs and Tasks that have strict budget controls.
2. Users and Resources
2.1 Create New Staff Member and Job Cost Resource in TimeTrak
In earlier versions of TimeTrak, both the Staff Member and Job Cost Resource needed to be created before setting up the user in TimeTrak. In Version 4.0, there was the added ability to create the job cost resource via the TimeTrak Admin Console. Now in Version 19.2, there is the ability to also create a Staff Member if a job cost resource is created in TimeTrak, allowing users to create all the required records within the TimeTrak Admin Console.
As per below in the TimeTrak Administrator Console > Users & Resources > Add > Click on the three dots in the Job Resource Selection > Add.

This will bring up the Job Resource creation box where you now have the ability to “Add Staff Record From Resource” as per below:
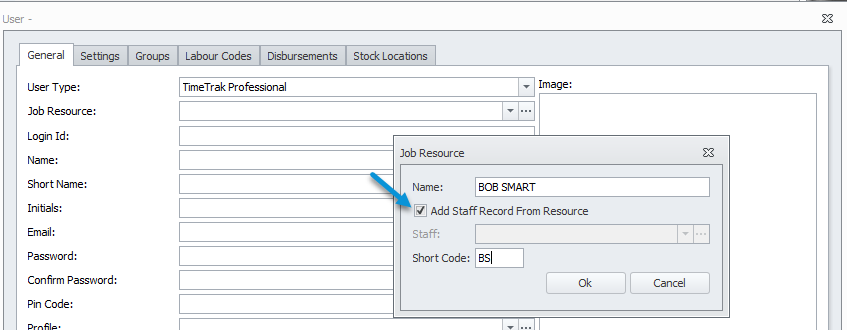
If enabled, both a job cost resource will be created as well as a staff member.
2.2 Copy TimeTrak User
In version 19.2 there is the ability to “Copy” a TimeTrak user to assist with the management of user set up in TimeTrak. As per below, within the TimeTrak Administrator Console under the Users & Resources selection select a user with similar permissions to your new user and right click to choose the “Copy user” function.
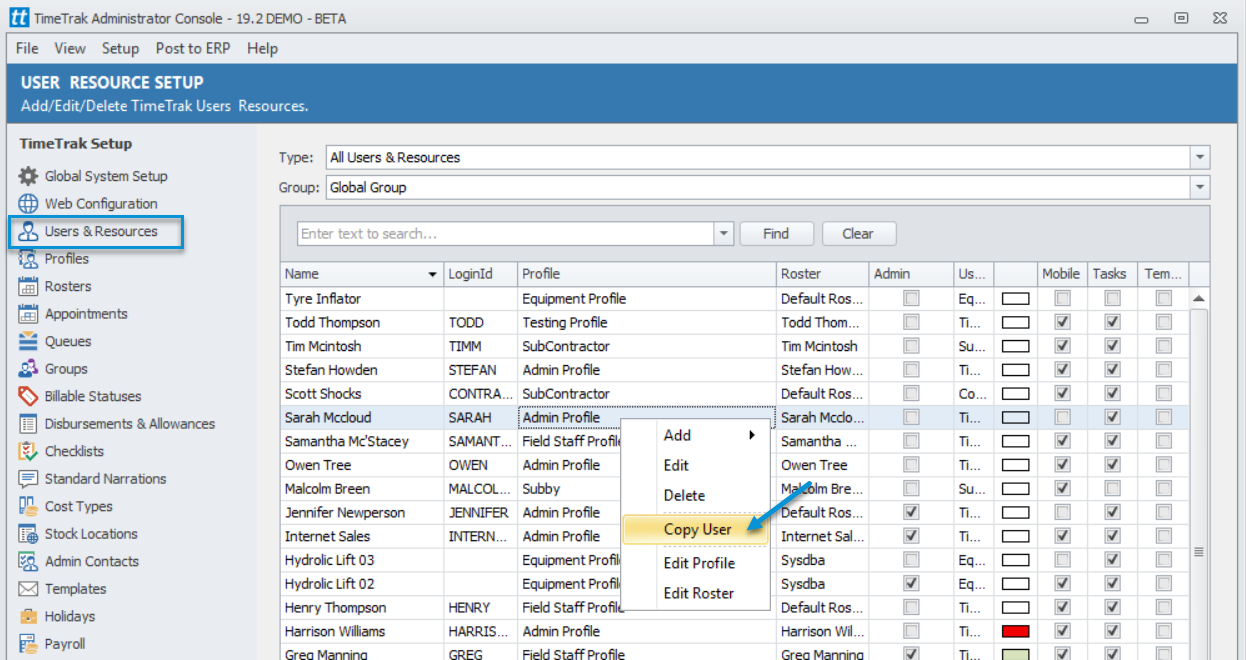
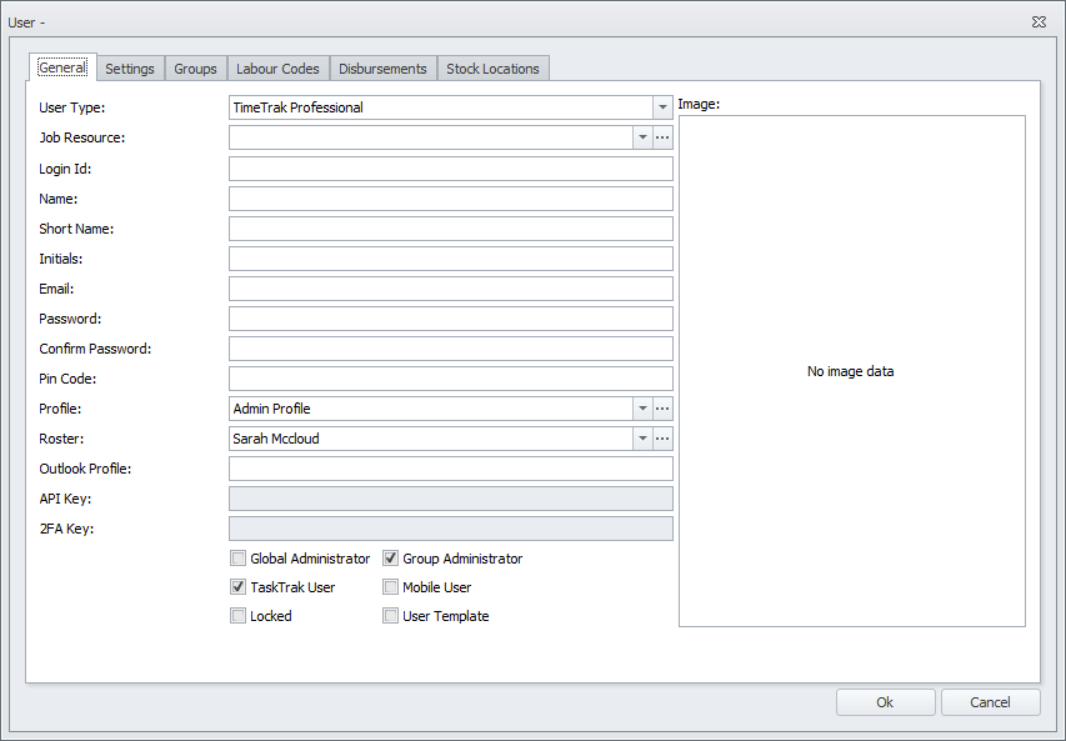
This will load the user setup screen, as per below, and the unique fields will be cleared for you to complete. The previous user’s Labour codes, Preloaded Disbursements and available Stock Location etc., will be copied through making the new creation process a lot more efficient.
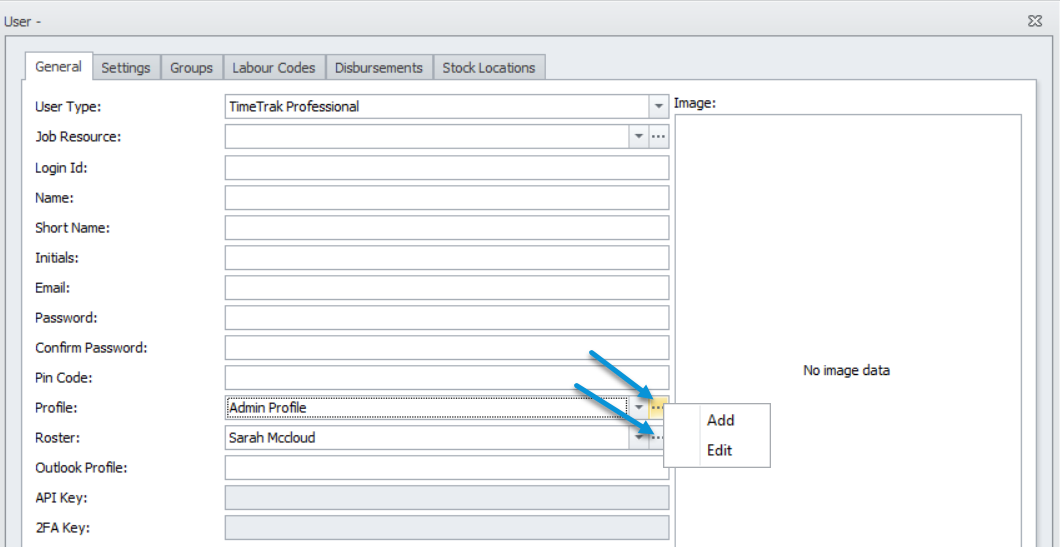
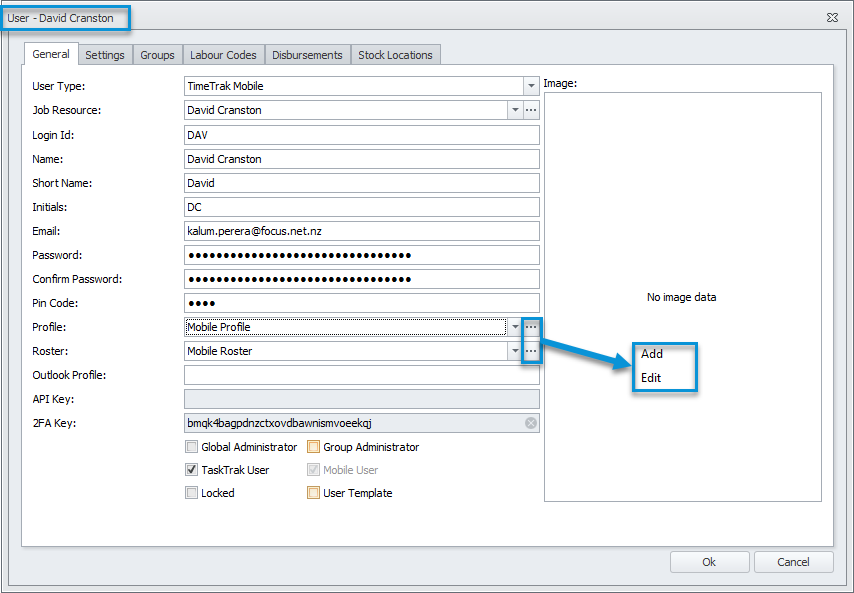
As per below, from the user screen within the Admin Console there is also the ability to “Add” and “Edit” both Profiles and Rosters:
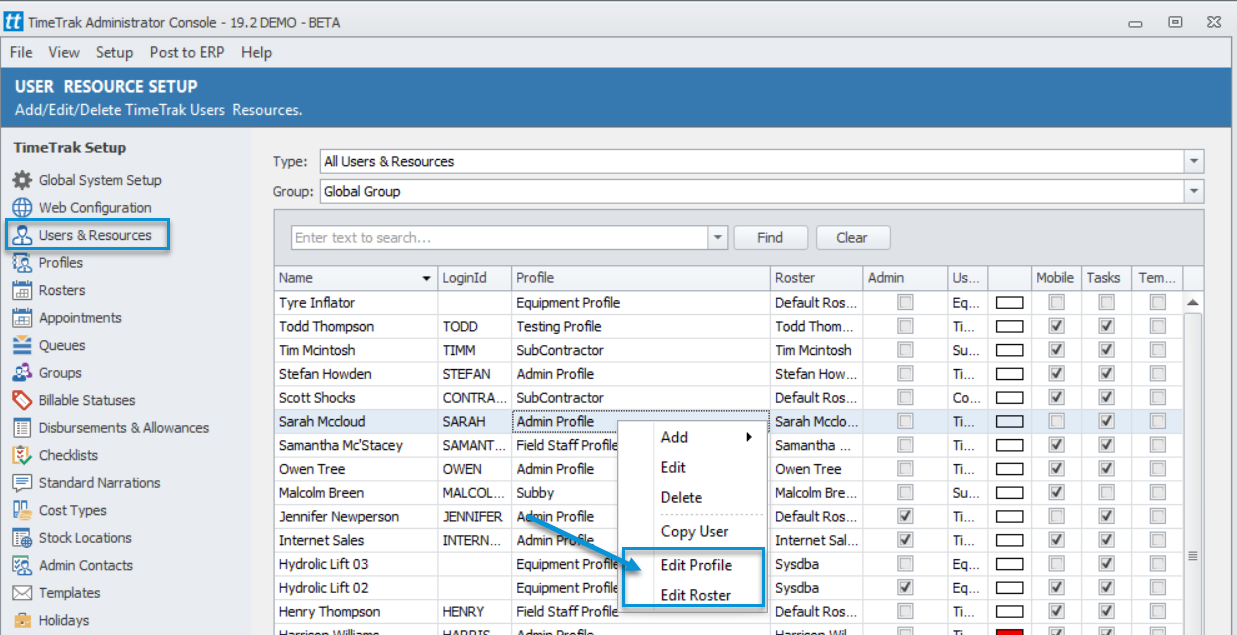
The ability to edit the selected user’s Profile or Roster is also available from the user grid within the TimeTrak Administrator Console via a right-click selection:
2.3 User Creation Template
Again, to assist with the management of user set up in TimeTrak, there is the ability to set up a user creation template; similar to the ability to “copy a user”. Creating a user template allows for the creation of new users from the user template and have all fields excluding unique copy across to the new user.
To create a user template, set up a user in TimeTrak as usual but ensure you enable the “User Template” setting as per below:
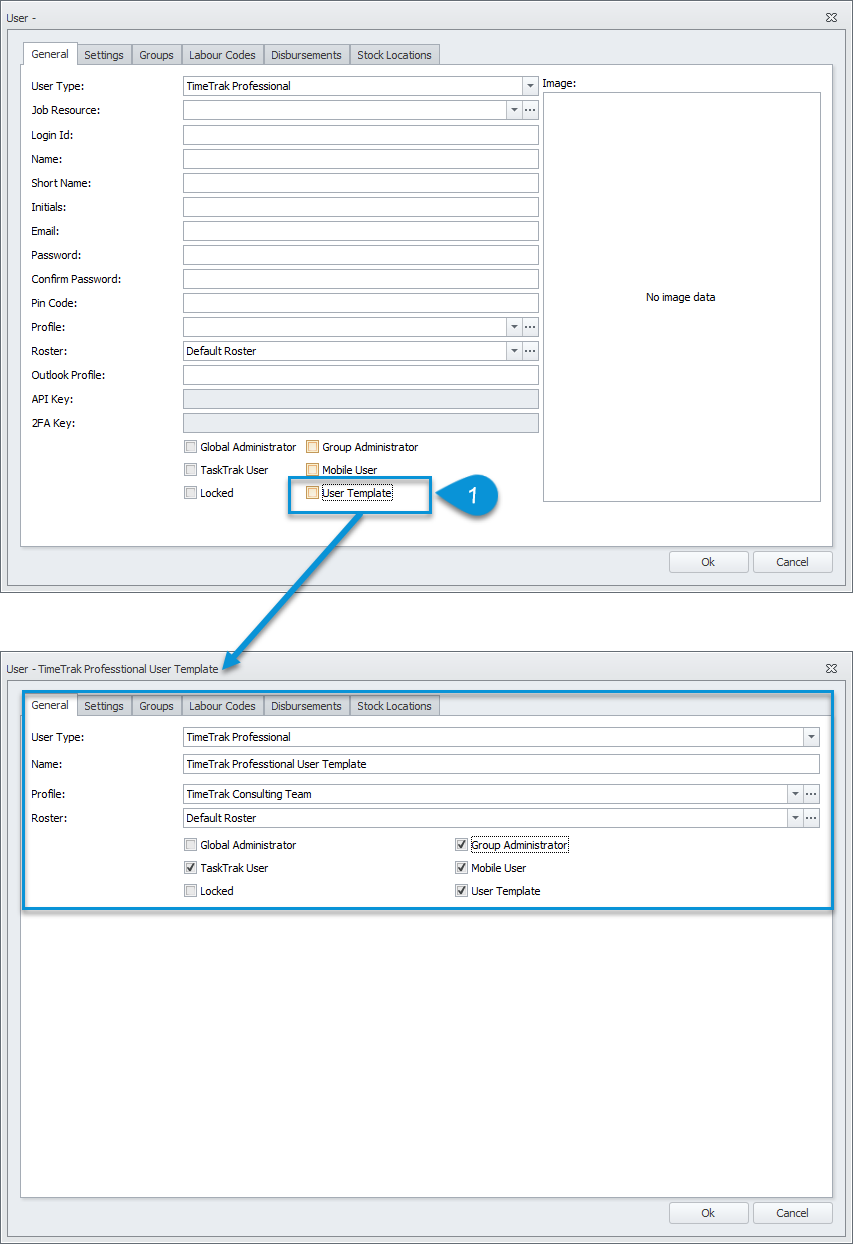
Once user template(s) have been created, new users can be created using the template following the below steps.
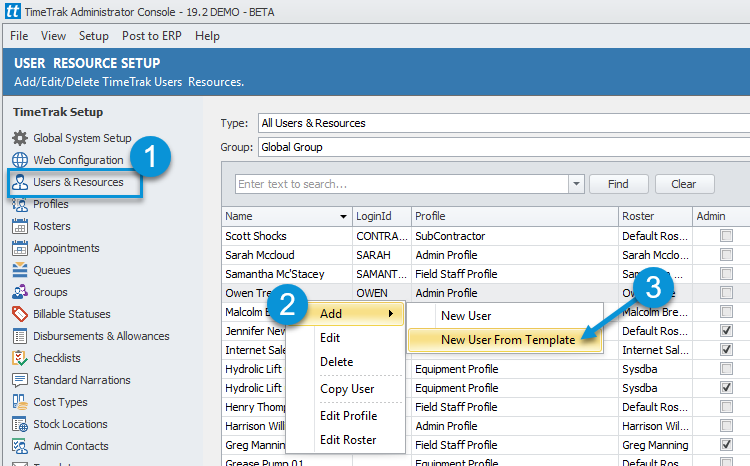
TimeTrak Administrator Console > Users & Resources > Right click > Add > New User From Template as per below:
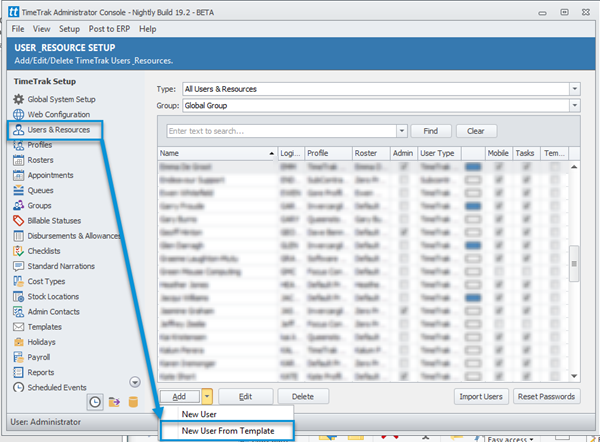
Or again, in the TimeTrak Admin Console > Users & Resources > Add > New User From Template as per below:
Select the template from which you would like to create the new user:
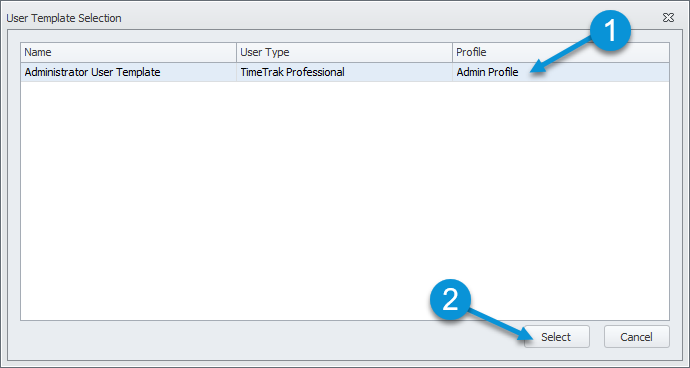
This will pre-populate all the fields that are not unique to a user from the TimeTrak User Template so that only the unique fields are required for the user setup. Configure all settings in General, Settings, Groups, Labour Codes, Disbursements and Stock Locations.
Note: Payroll settings will not be copied to the new user.
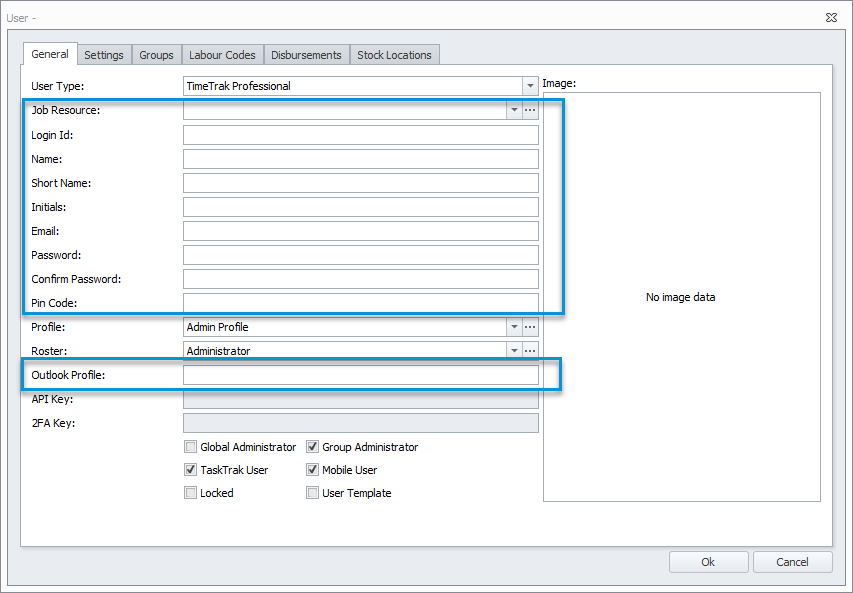
Note: A TimeTrak User Template does not require any TimeTrak licences.
2.4 Edit roster and profiles settings
In TimeTrak 19.2, Roster and Profiles can be edited in user settings with simple Right Click. This will further allow TimeTrak Administrators to add new profile or roster settings to the user without toggling between screens.
2.5 Import TimeTrak users from job resources
Continuing with the management of user set up in TimeTrak, there is the ability to import TimeTrak users from job resources.
Note: You must have a TimeTrak User Template setup in the TimeTrak Administrator Console to complete this action.
As per below:
- In the TimeTrak Administrator Console > Users & Resources > Import Users.
- Enable “Import From Job Resources”.
- Select the Default User Template and password that you would like to be set against the imported users.
Note: If you enable Force Password Expiry when imported users log in using the Default set password they will be promoted to update this.
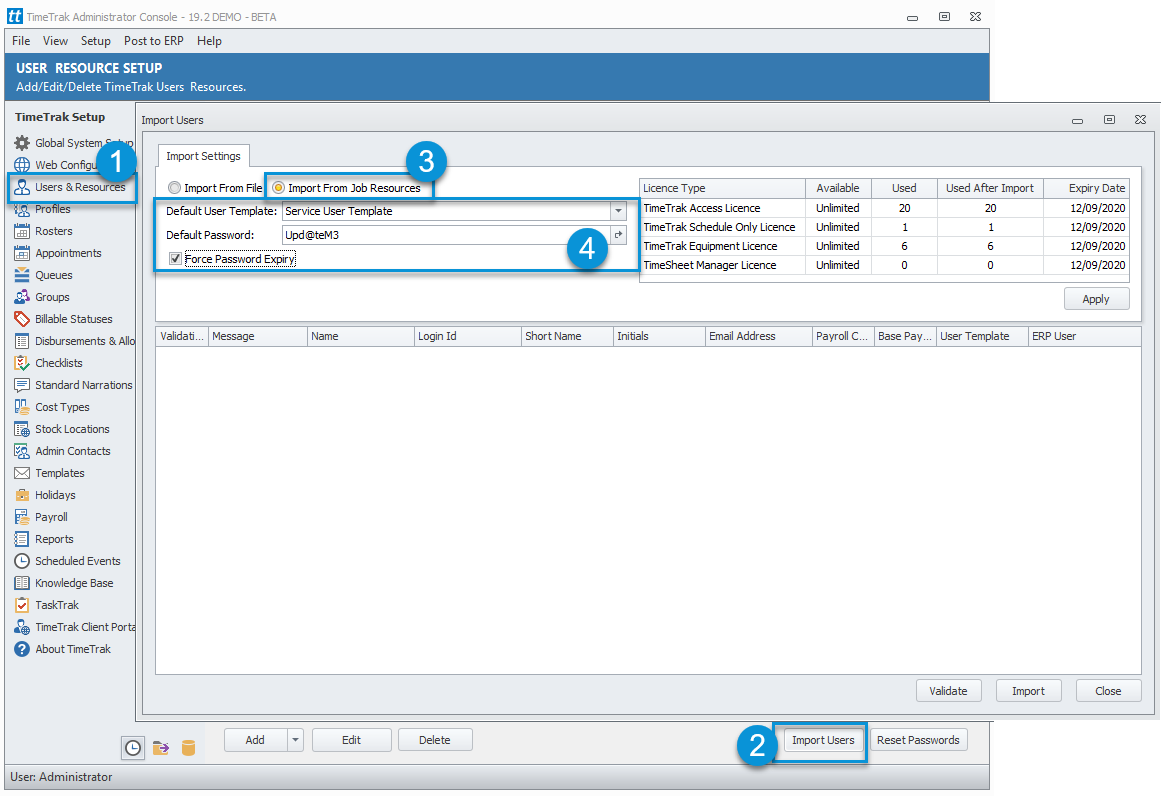
By clicking “Apply”, this will populate the user grid with all job cost resources in the ERP system that are not currently assigned against a user in TimeTrak.
Users will validate on loading. If any validation error occurs, it will be displayed on the left corner of the grid with icon. In the below example, all these users require an email address against them.
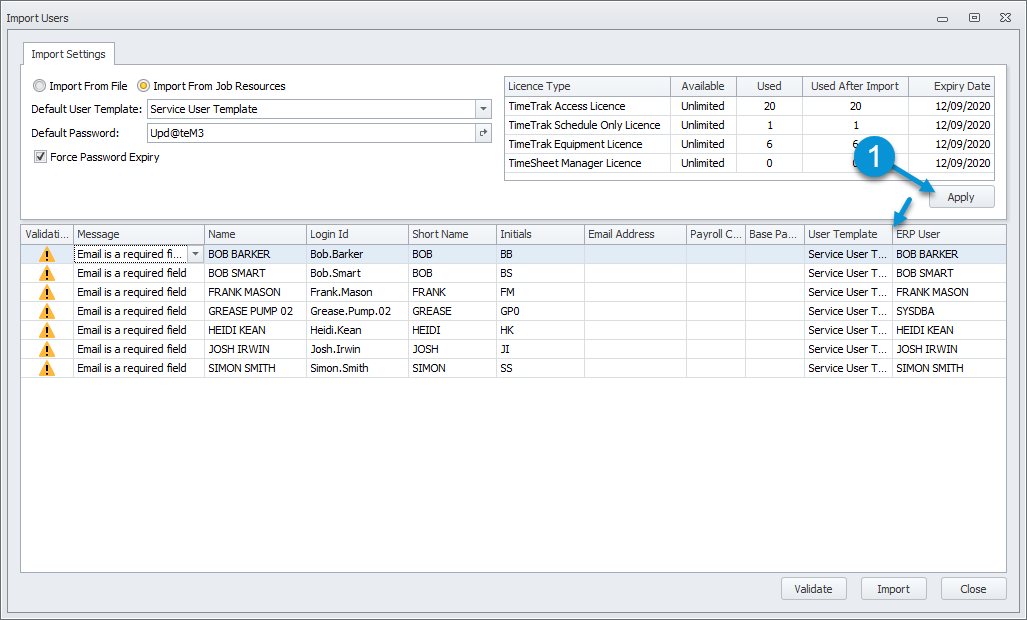
Update the data against users as required. Example: Email address Payroll Code and alter the user template if a user needs a different template from the rest.
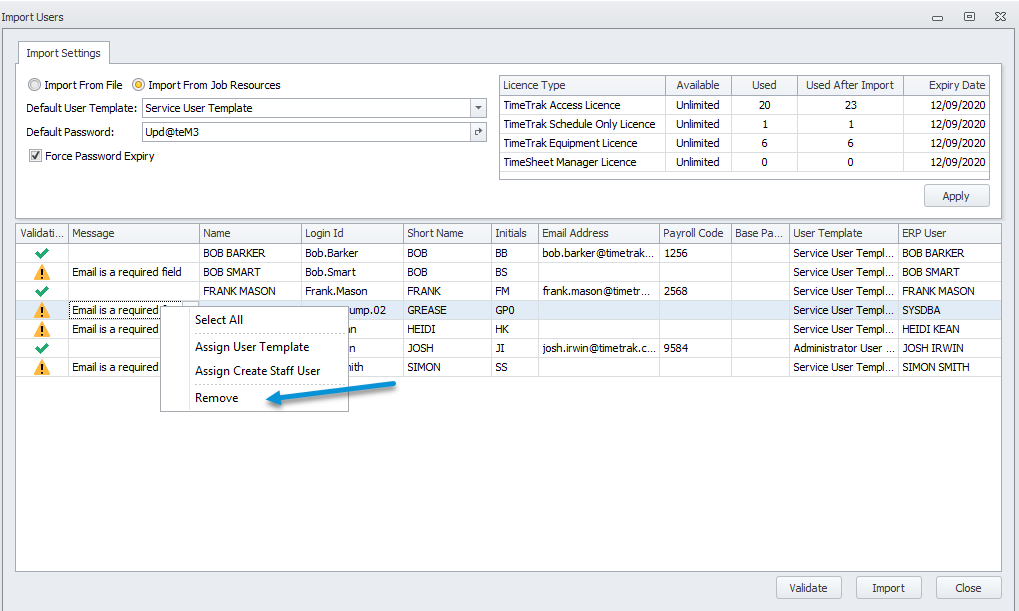
If you do not wish to import all users, right click users whom you do not wish to import and select “Remove” as per below:
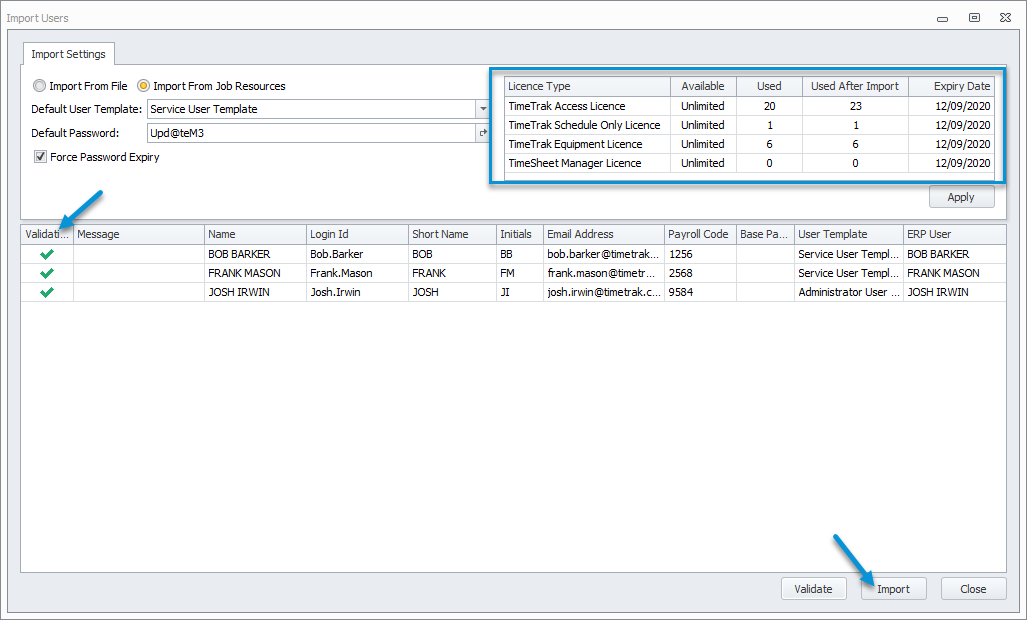
Once you are happy with the user’s import grid and the data entered, click Validate to ensure all data entered is valid, which will populate green ticks in the validate column as per below then Import.
Note: Your TimeTrak licencing will be displayed in the right-hand corner so you can see if you have enough licencing to import users.
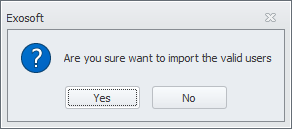
The below confirmation box will appear, click Yes if you wish to import.
The below will appear to confirm that all users have been imported successfully.
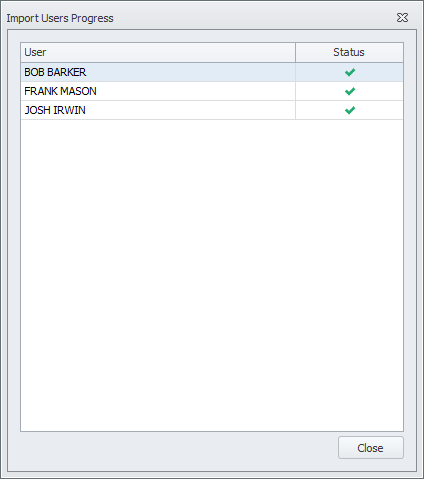
2.6 Import TimeTrak Users from CSV file
The final enhancement to assist with the management of user set up is the added ability to import TimeTrak users from a CSV file.
Note: You must have a TimeTrak User Template setup in the TimeTrak Administrator Console to complete this action.
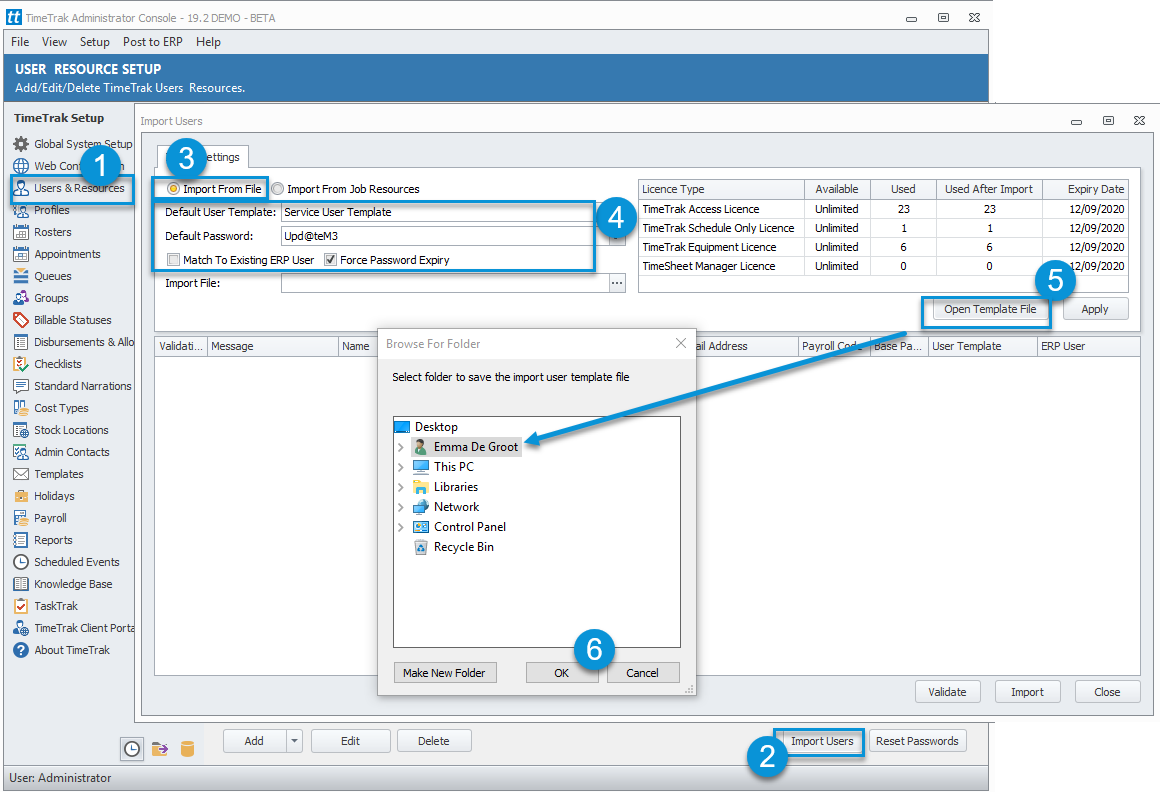
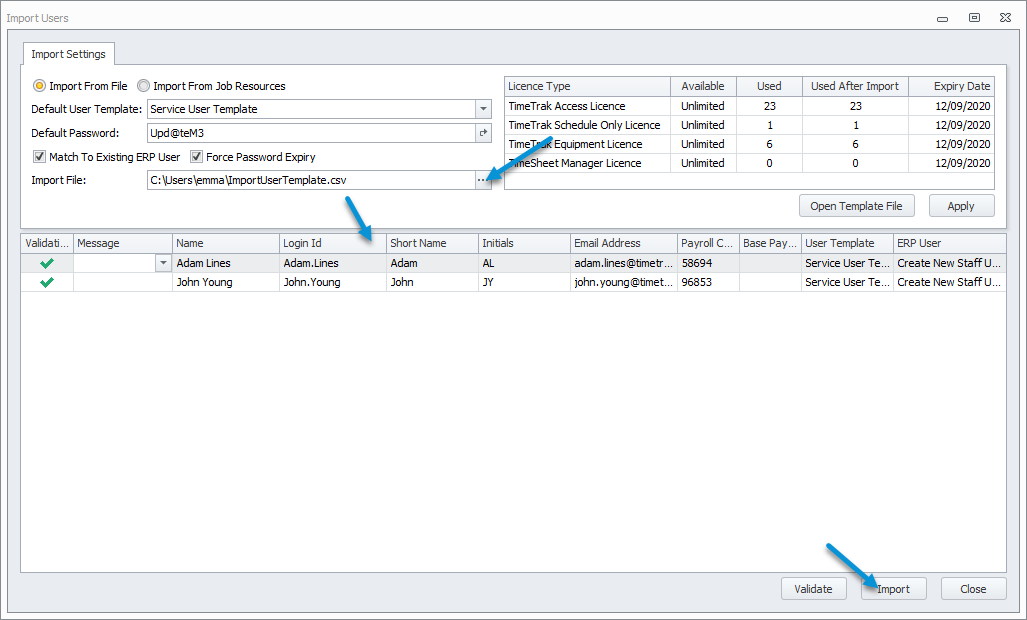
Very similar to the Import from Job Resource function as per above, within the TimeTrak Administrator Console > Users & Resources Import Users.
Enable “Import From File”
- Select the Default User Template and password that you would like to be set against the imported users.
- If you enable “Force Password Expiry” when imported users log in using the Default set password, they will be prompted to update this.
- If you enable “Match To Existing ERP User” then imported users job resource will be matched against existing ERP Users. If this is not enabled a new ERP User will be created for the imported user.
- Click the Open Template Button and specify the location you would like to save the CSV file to.
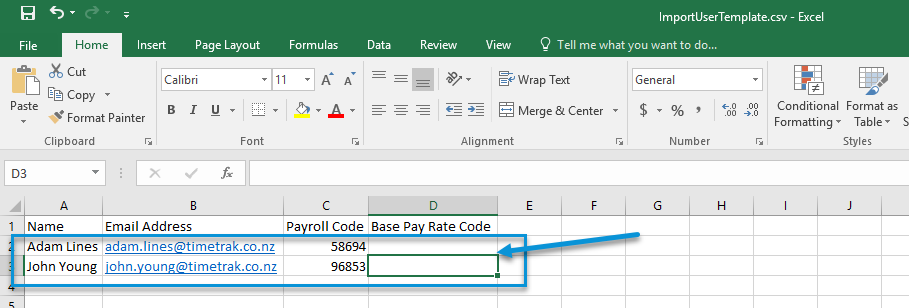
This will open the below Excel file which you can populate with the user(s) that you wish to import into TimeTrak.
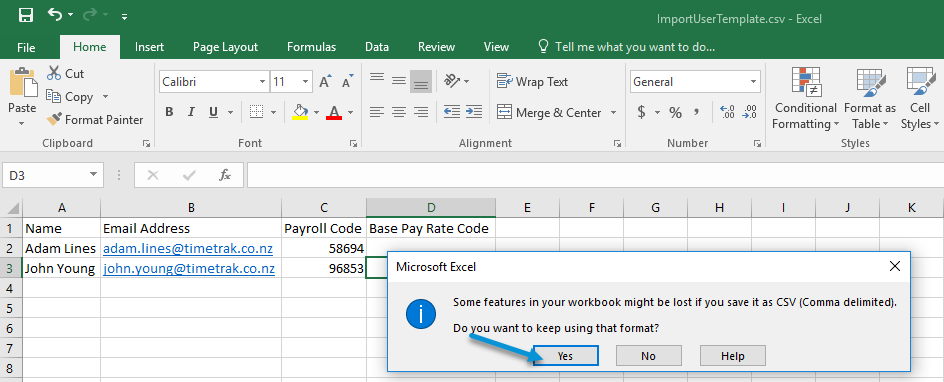
Save the file as a FileName.CSV, clicking Yes to the below prompt:
Then back in the TimeTrak Administrator Console Import Users screen browse and select the file you have just saved. Once imported ensure the data is correct and update user templates, if required.
Ensure data validates without any errors. Click Import.
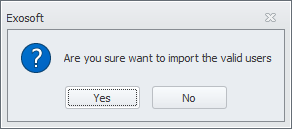
The below confirmation box will appear, click Yes if you wish to import.
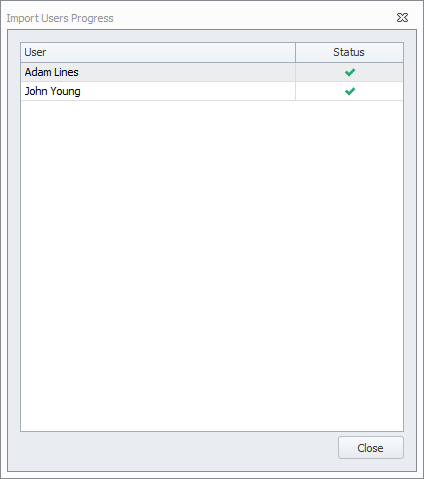
Below will appear to confirm that all users have been imported successfully.
3. Invoicing in TimeTrak Professional
For many TimeTrak users, the best enhancement in 19.2 is the ability to invoice from TimeTrak Professional. While there has been the ability to post and invoice a job from TimeTrak Mobile since late 3.2, the ability to do this has now been brought into the TimeTrak Professional.
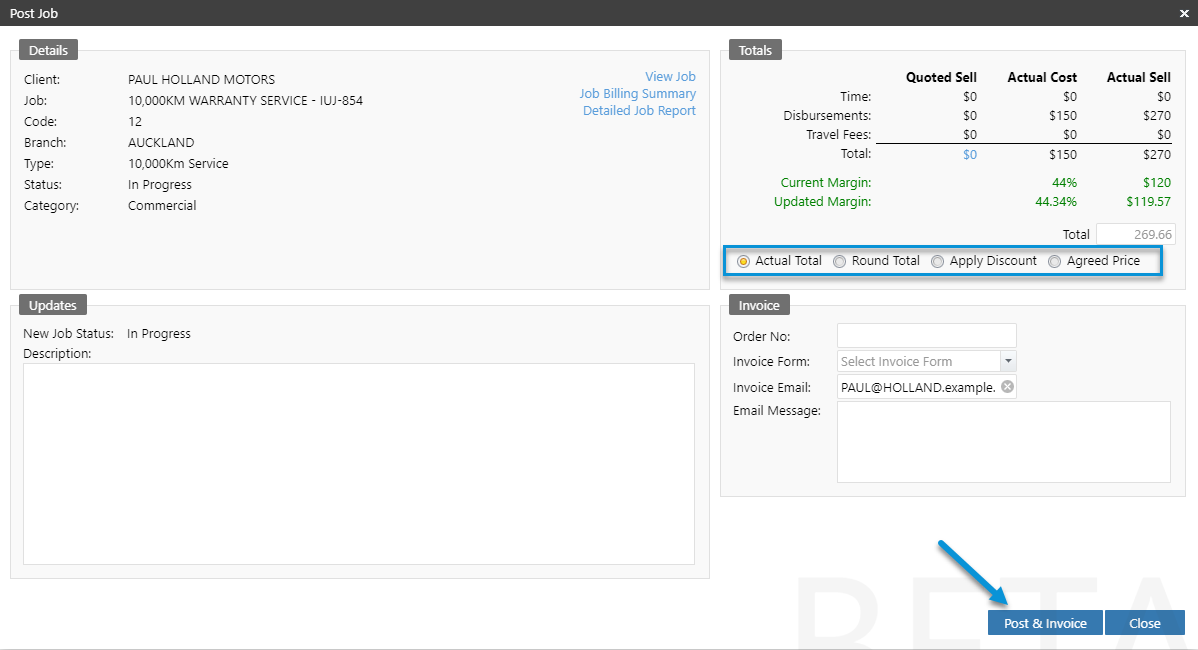
As per below, on posting and invoicing a job in Professional the posting screen has been altered and the job description can be updated within this screen. If permissions allow the invoice can also be generated and emailed at the same time with a custom message that can be sent along with an email template to the client.
There is the ability to update the Actual total to the quoted total, rounding off total based on pre-set parameters in decimal places, apply a discount as well as amend the invoice total if permissions allow using either a variance stock code or pro rata the change across all lines.
Once the job is posted, icon and the invoiced
 icon will appear in all posted and invoiced time entries.
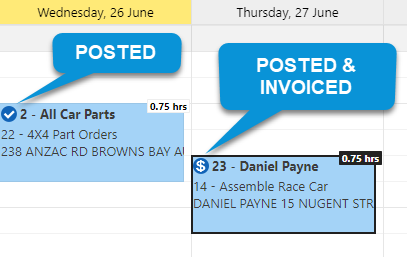
Note: If Bill of Material (BOM) is added directly to the Job in MYOB Exo and ready to be invoiced, TimeTrak 19.2 has an ability to post and invoice all line items from TimeTrak Professional or Mobile.
For more information on Invoicing from professional, please see our whitepaper.
4. Review Transactions against jobs and clients in TimeTrak Professional
TimeTrak 19.2, Professional now has the ability to see transactions generated against both a job and the client. You can activate this option by selecting “Show Transactions” and “Show Transaction Lines” in Profiles under TimeTrak Admin Console.
If user’s profiles have the below settings enabled:
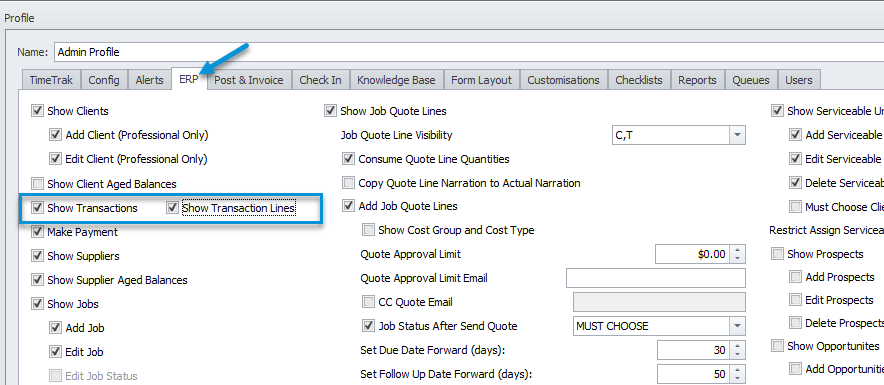
Against a job, there will be an additional tab “Job Invoices” which displays invoices that have been generated from the job as per below:

Also against the client, there will be an additional tab “Transactions” which displays transactions against the account as per below:
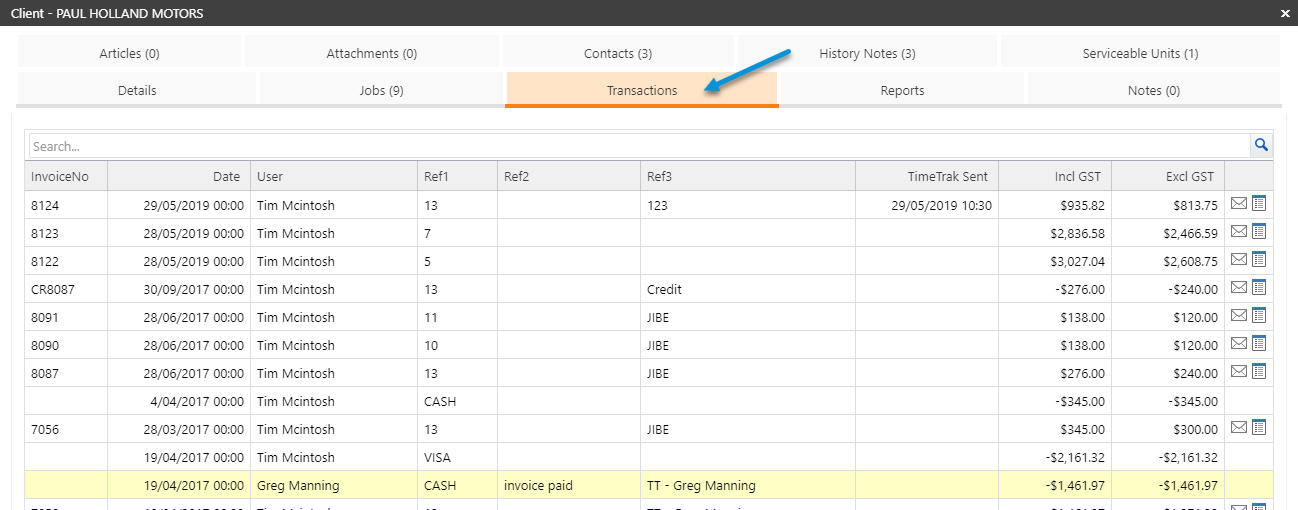
From any of these transaction lines, users can email the invoice to another user or generate the invoice report to review the invoice. If the invoice has been sent from TimeTrak, the TimeTrak Sent field will be populated with the time and date it was sent as per below:

5. Activity Tab against jobs in TimeTrak Professional
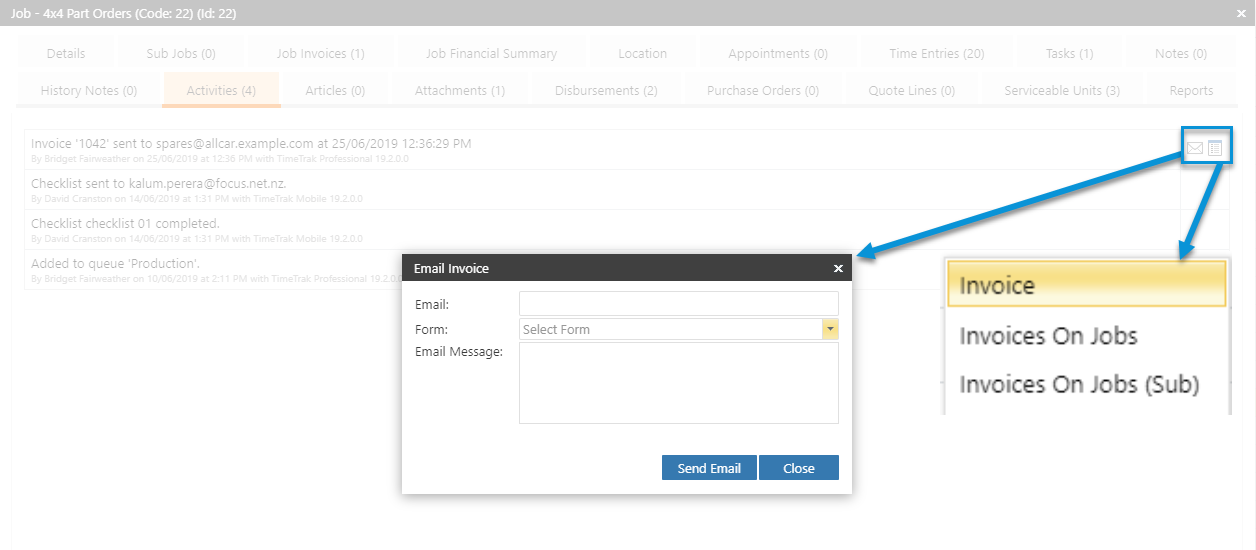
TimeTrak Professional has an ability to invoice and review invoice transactions against the job through a new “Activities” tab as per below.

Currently, the Job Activities is populated with Invoice, Purchase Order and Checklist data. As a result, invoice data displays the invoice that was raised, whom it was sent to, and if there was any custom email text added.
Like the Job and Client Transaction tab, Invoices can be reviewed and emailed again from the activity tab as per below:
Purchase Order data displays any purchase orders which have been created against the job, who it was sent to and if there was any custom email text added.
Checklist data displays any checklists which have been completed against the job, who completed and when it was completed.
6. Purchase order email improvements
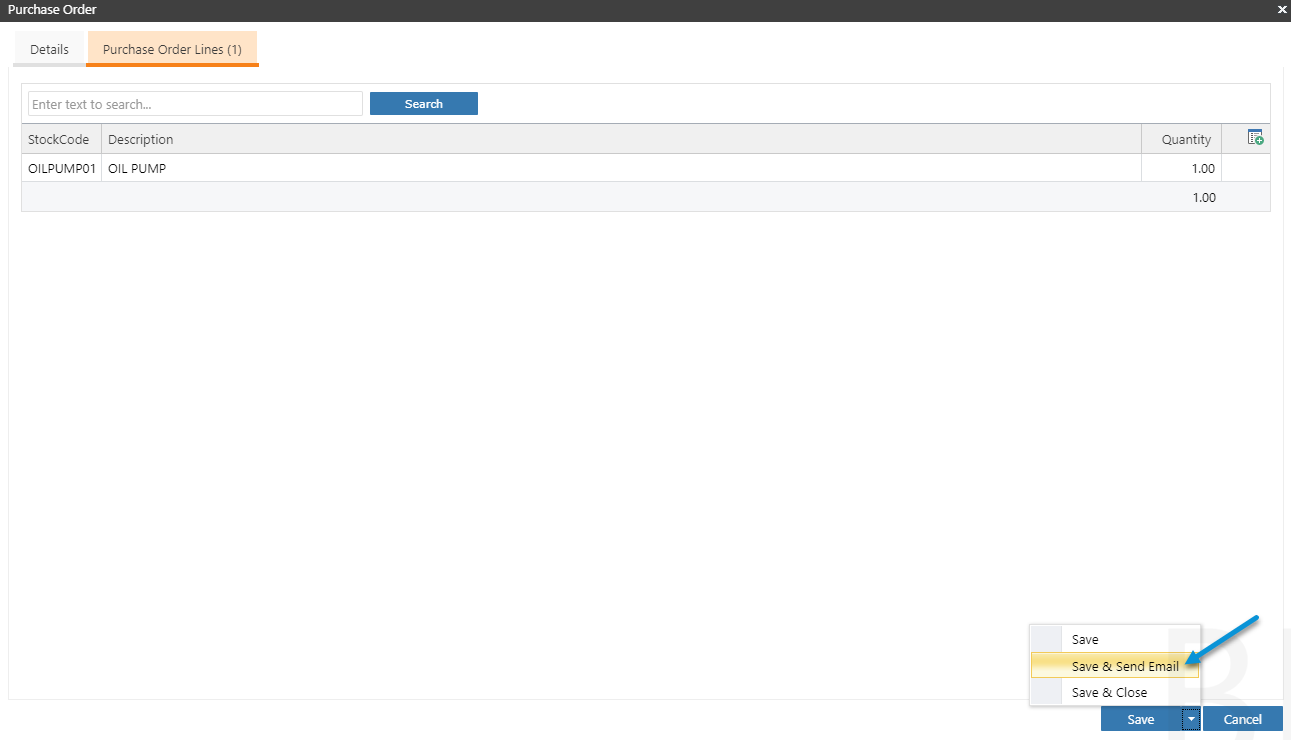
Previous versions of TimeTrak, when generating a purchase order in TimeTrak Professional, the purchase order report had to be manually run and then emailed from within the report.
In TimeTrak 19.2, on the creation of a purchase order in Professional there is now the ability to Save & Send Email as per below:
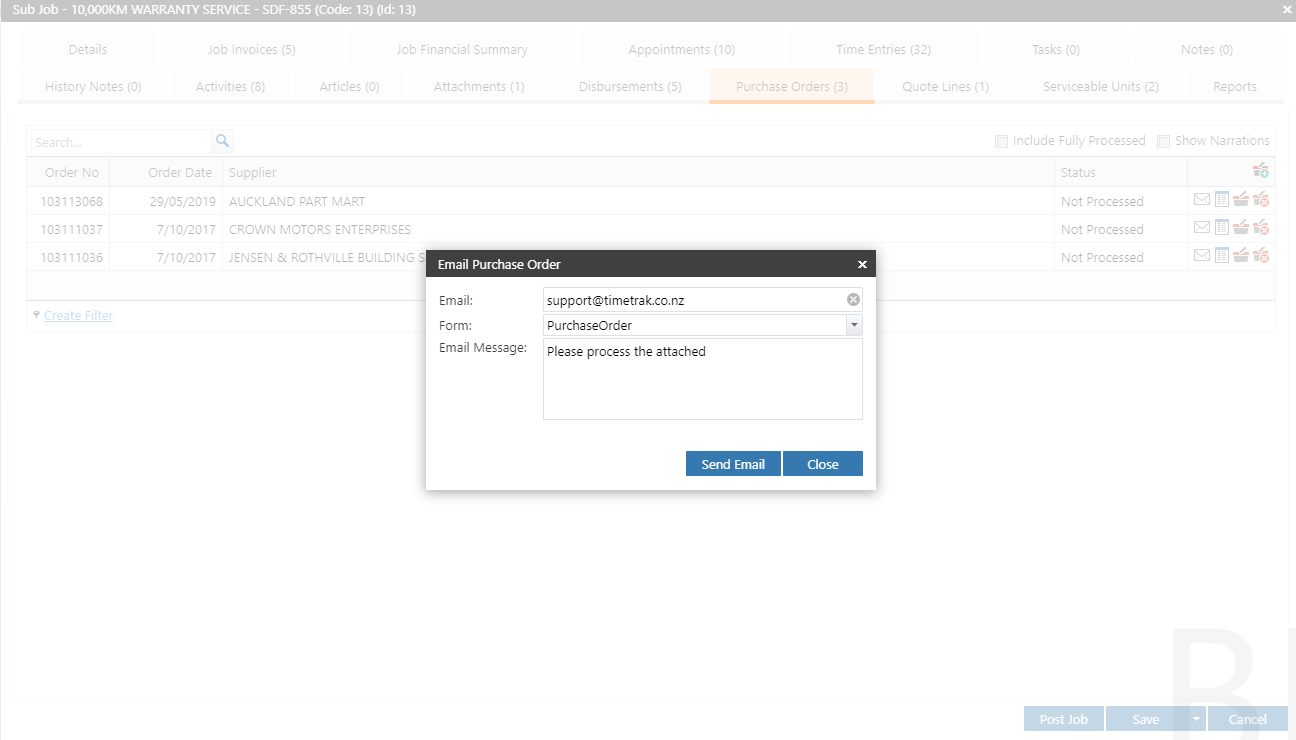
Which will pop up the below form allowing users to enter a custom email message and select the purchase order report (if there is more than one loaded in the database).
7. Added WIP and status key column to jobs grid in TimeTrak Professional
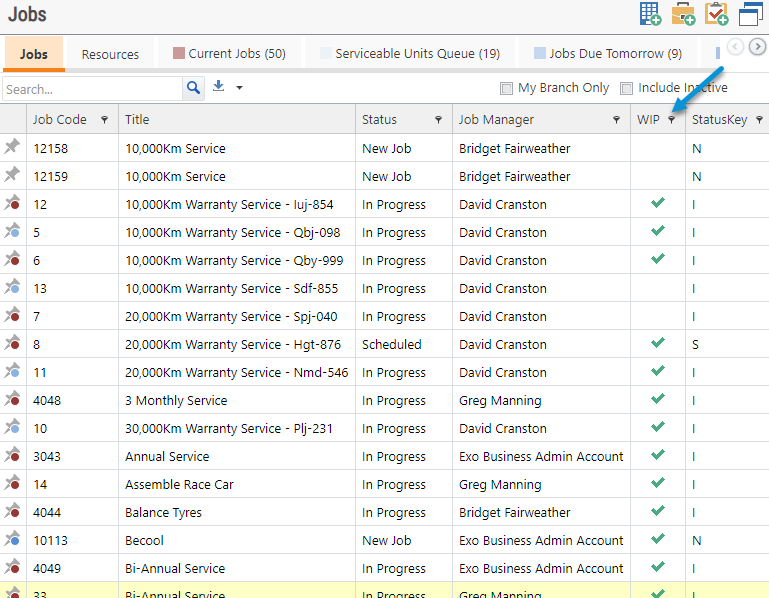
In TimeTrak 19.2, there is also a Job grid column “WIP”. This grid displays a green tick if the job has any WIP (Work in Progress) data entered against it in either TimeTrak or directly against the job in the ERP system.
This clearly shows Professional users which jobs have data entered against them, which may require invoicing.
The Added Status Key field is the Job Status Key which allows users to display the job status without having the status column description visible (which takes up more room on the screen).
8. New features in TimeTrak Checklists
8.1 Colours in radio buttons and auto-save
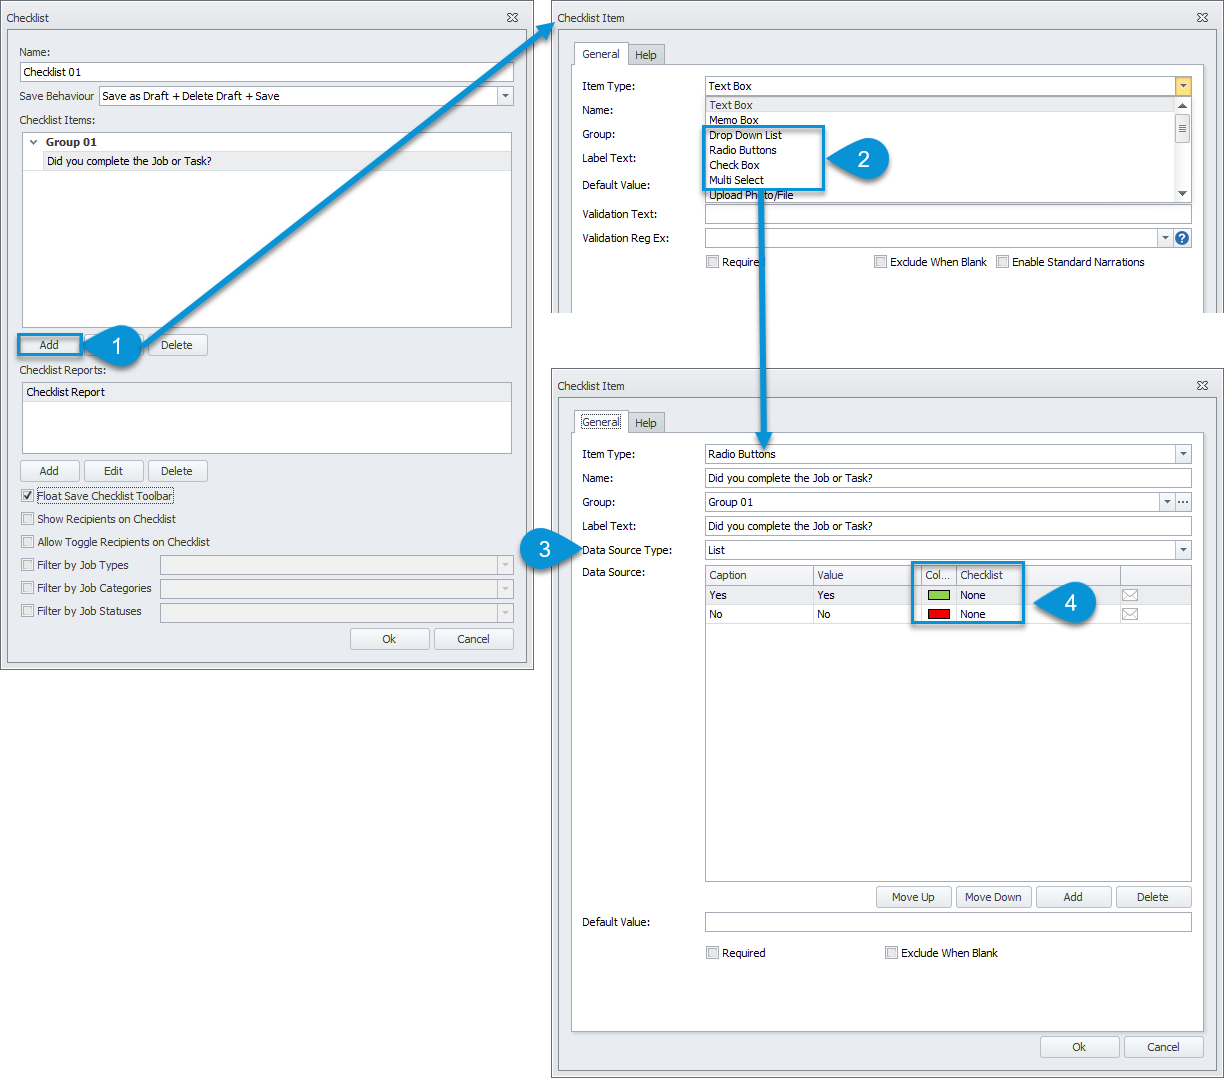
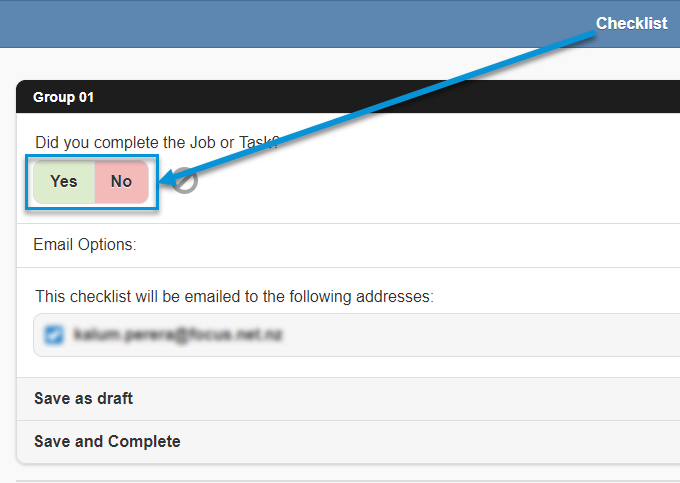
In TimeTrak 19.2, Checklist radio buttons can be configured with colours. This will allow TimeTrak Mobile users to have clear visibility of important checklist items.
To enable this option, when Checklist Radio button is configured, choose an appropriate colour as per below steps.
They display in TimeTrak Mobile Checklists as per below allowing the user to clear the selection with icon.
icon.
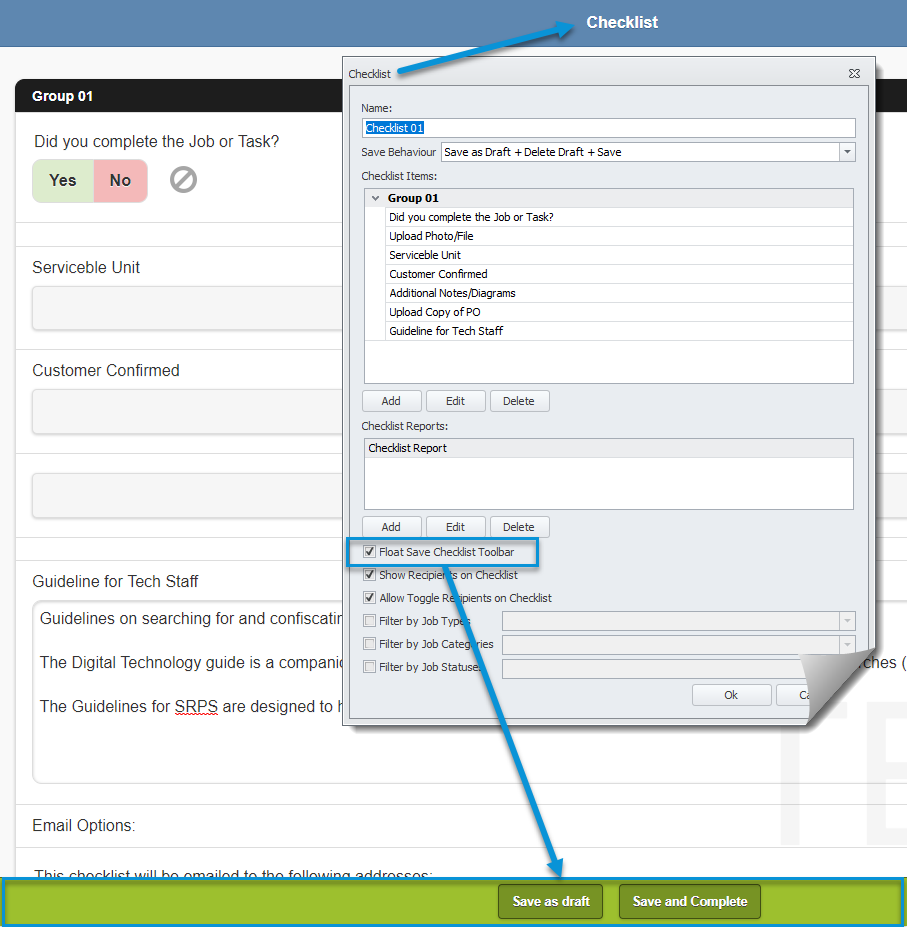
In TimeTrak 19.2, Float Save Checklist Toolbar setting will allow TimeTrak Mobile user to see a floating toolbar on the bottom of the screen. This feature allows the user to save the checklist without scrolling through to the end of the checklist.
8.2 Checklist Item Template
The majority of our customers are using checklists within TimeTrak to get client sign off on work completed, however within the checklist previously there is no way to display what the client was “signing off” as this data was generally added to the checklist report.
In TimeTrak 19.2, there is the ability to have Checklist Item Templates.
These Item templates can be configured as per client requirements to display hours and parts entered against the job or hours and parts entered against the job within the current check-in.
These item templates can also include serviceable unit and claim measurable information as per below.
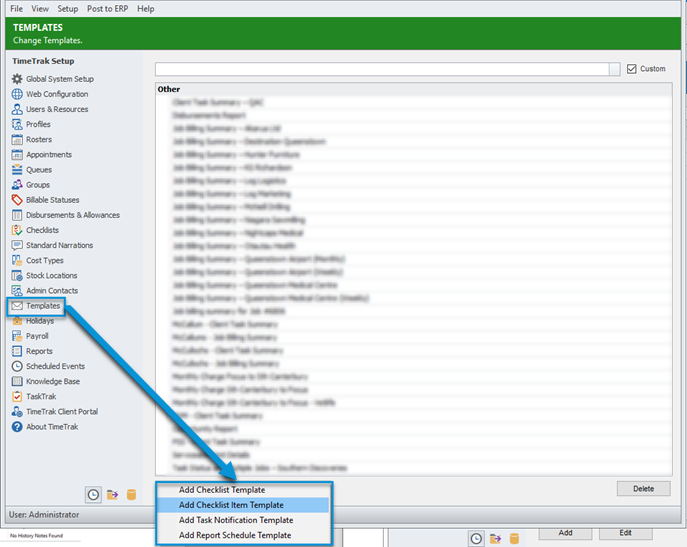
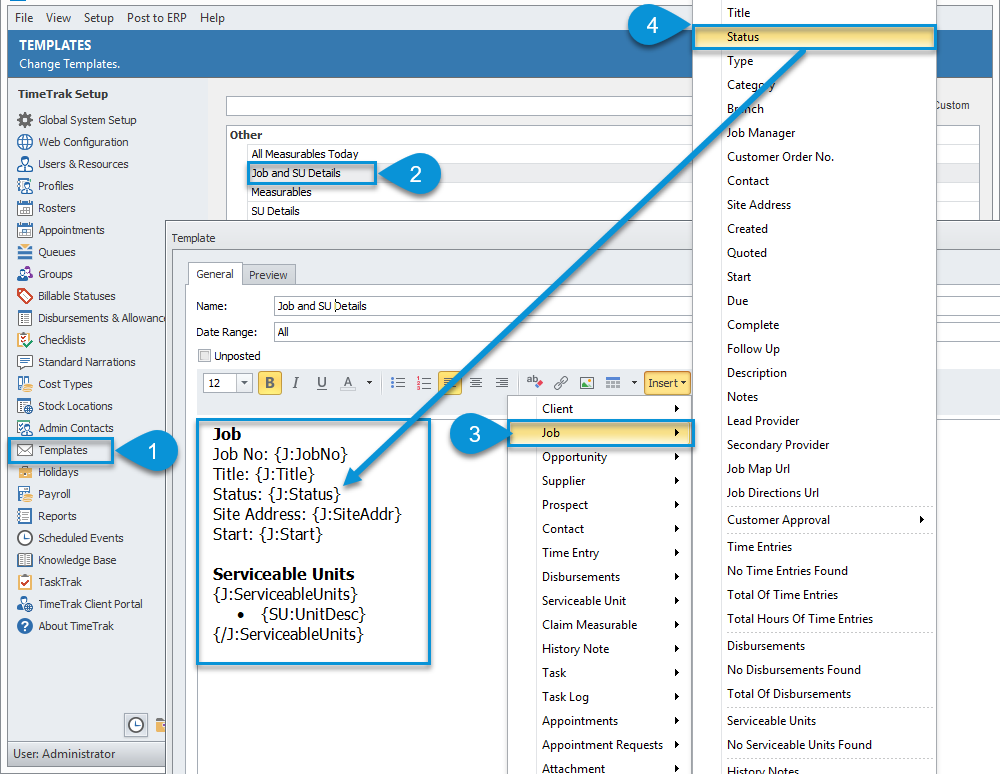
To create a custom checklist item template:
- TimeTrak Admin Console
- Templates
- Add Checklist Item Template as per below
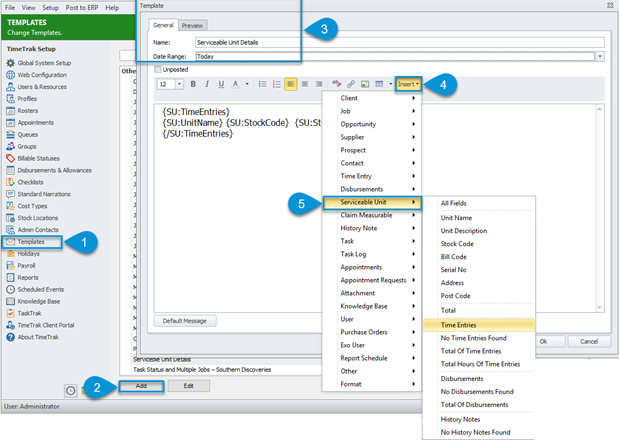
Select required information from the dropdown as per below.
Add checklist item and select the template as per below screen.
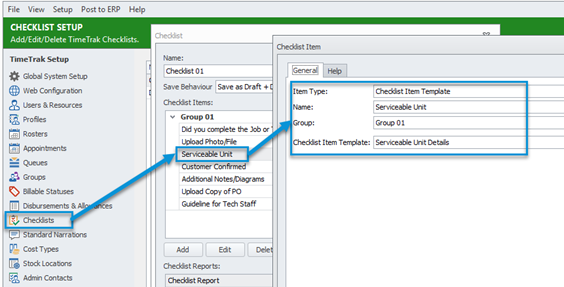
Similar to Serviceable Units, other Checklist Item template allows you to add specific information to it’s checklist as per below.
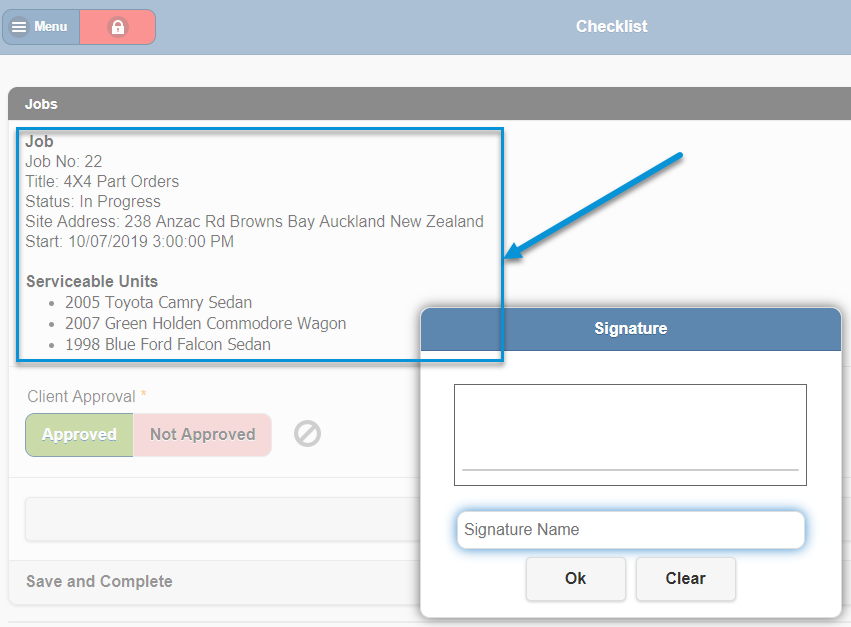
For more information on Checklist Item Templates, please view our whitepaper.
8.3 Standard Narration in a Checklist
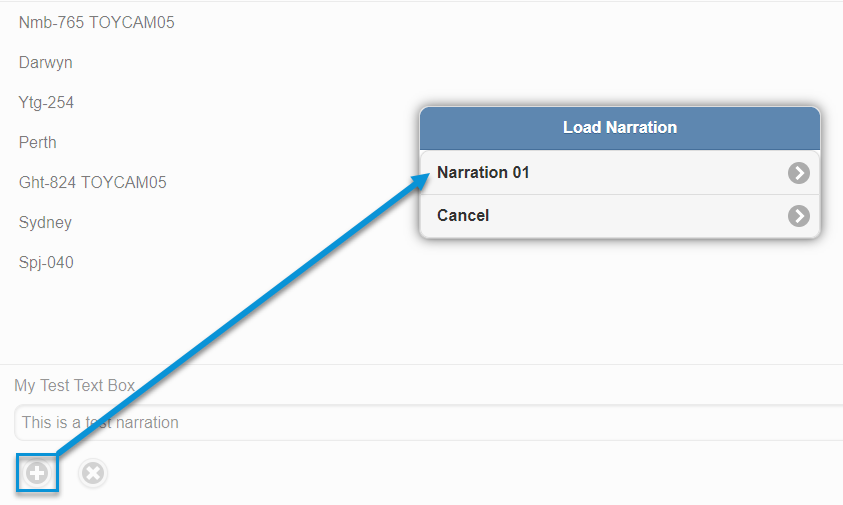
TimeTrak 19.2 has an ability to add standard narration to checklists. This feature will allow users to load a pre-set narration by clicking + icon on the checklist.
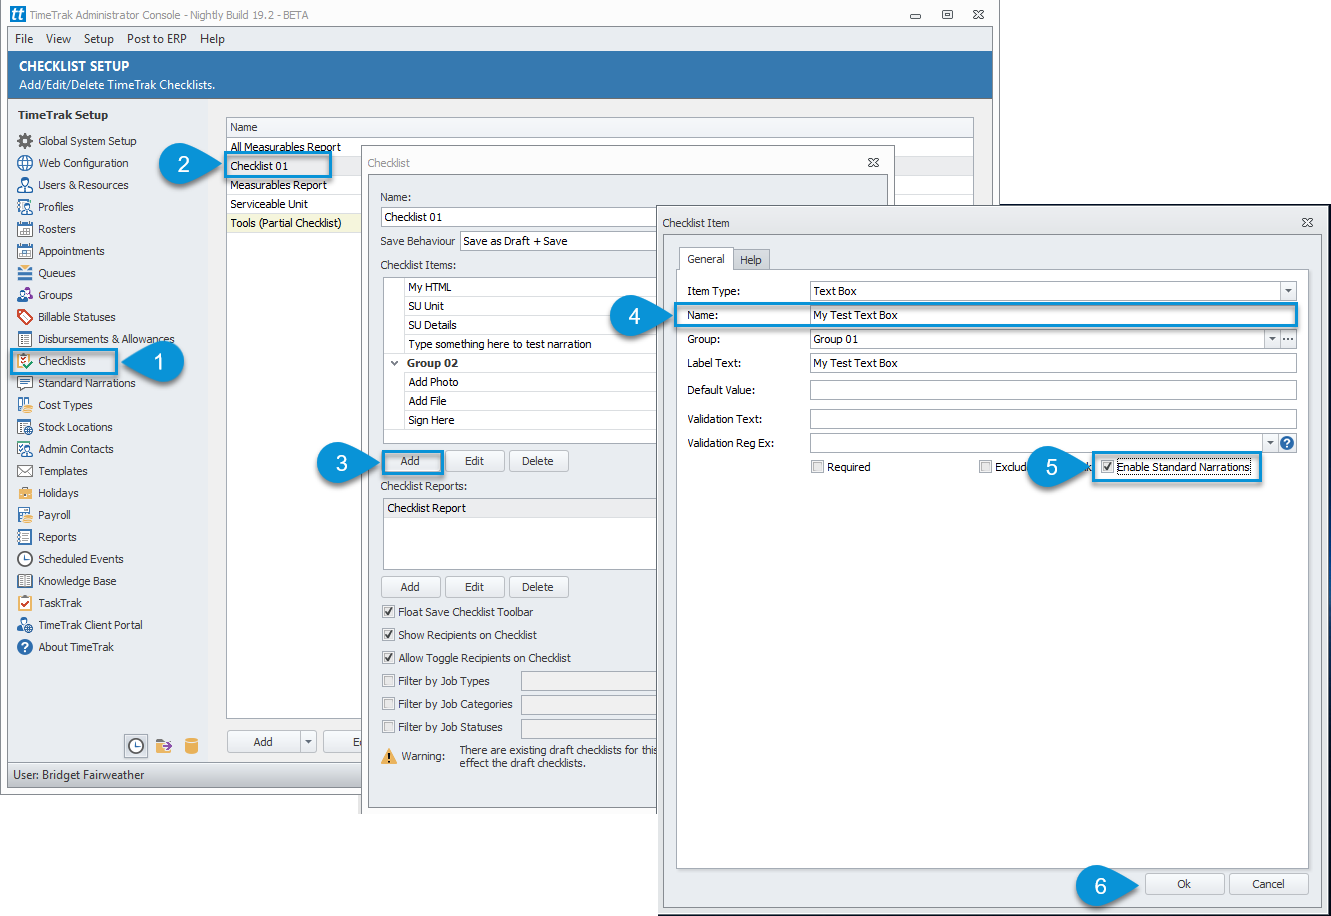
To enable this option, configure Standard Narrations in TimeTrak Admin Console.
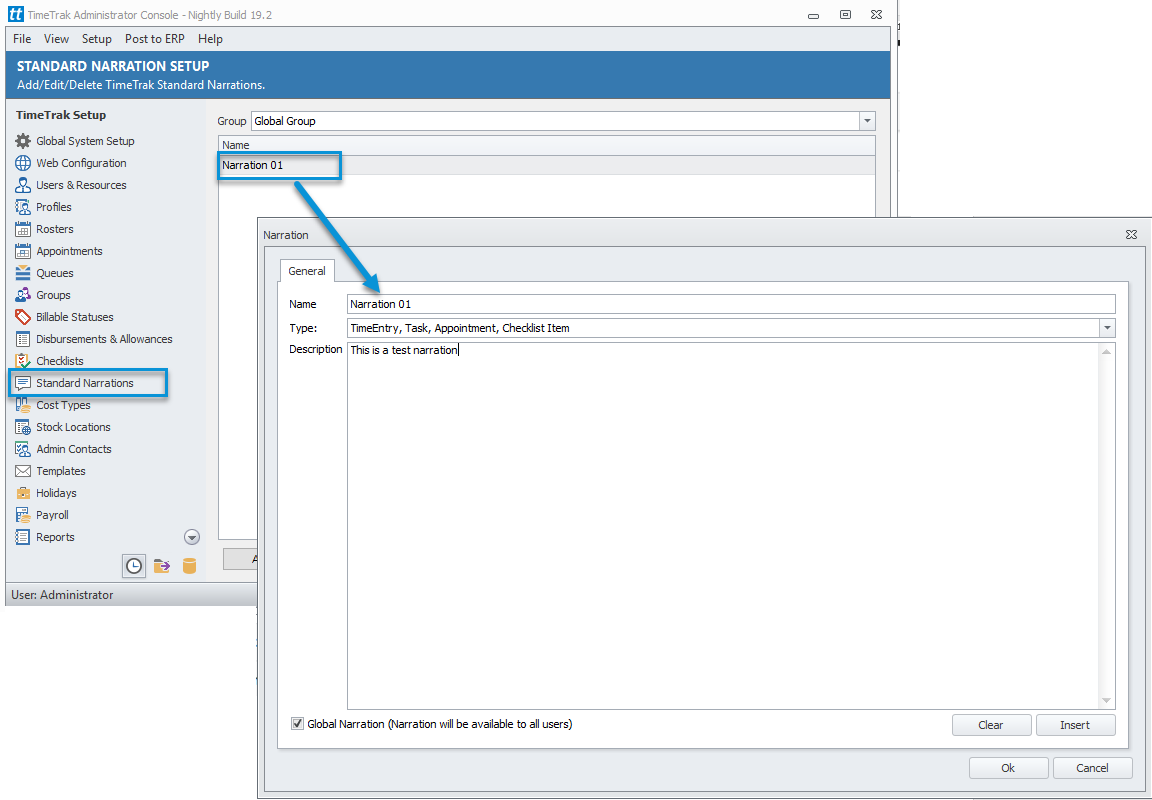
Enable Standard Narration in Checklist as per below steps.
Standard Narration will be added to the checklist once + icon is clicked in TimeTrak Mobile.
8.4 Serviceable Unit Checklists save against Serviceable Unit
In TimeTrak 19.2, if a serviceable unit was selected within a checklist, the checklist report will be not only be saved against the job, but also the serviceable unit. This provides the ability to review a “service history” via checklist forms directly from the serviceable unit attachments instead of working through jobs the unit has been assigned to.
To enable this feature, add Checklist Item and select Item Type; Serviceable Unit as per below.
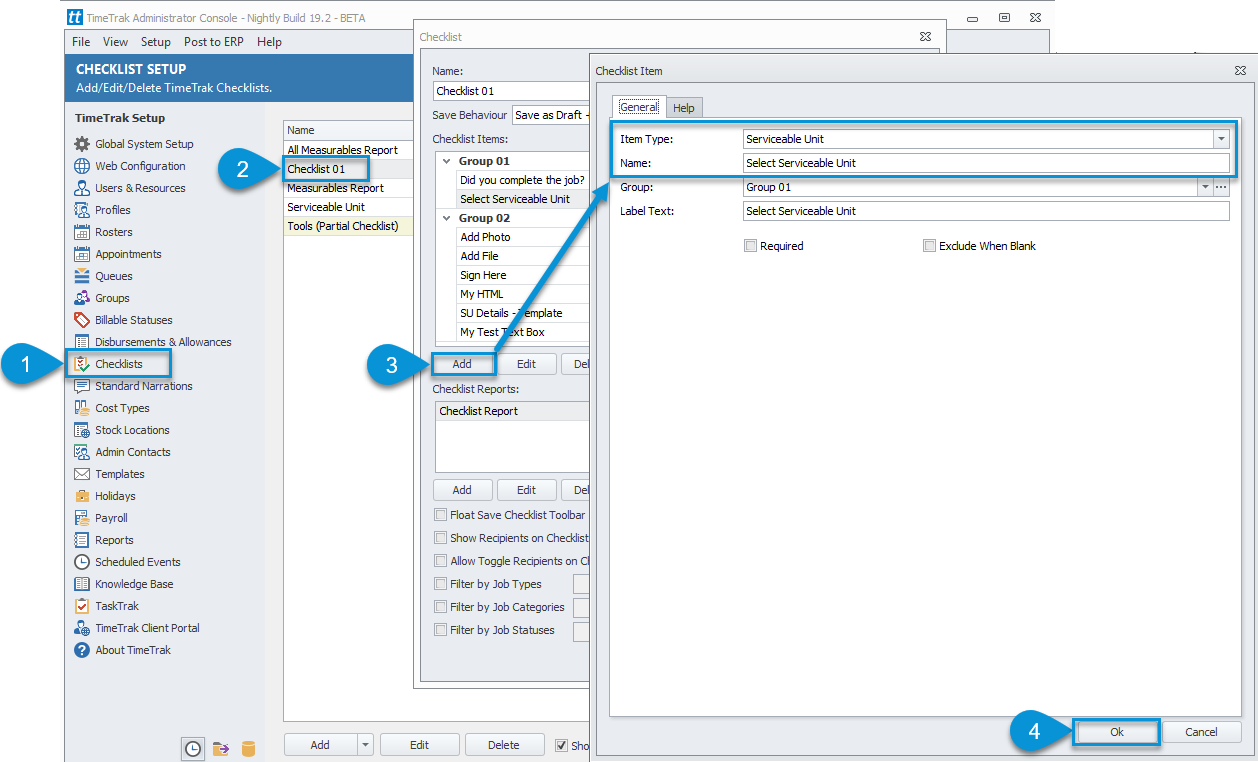
The checklist includes a Serviceable Selection option in the Job Checklist.

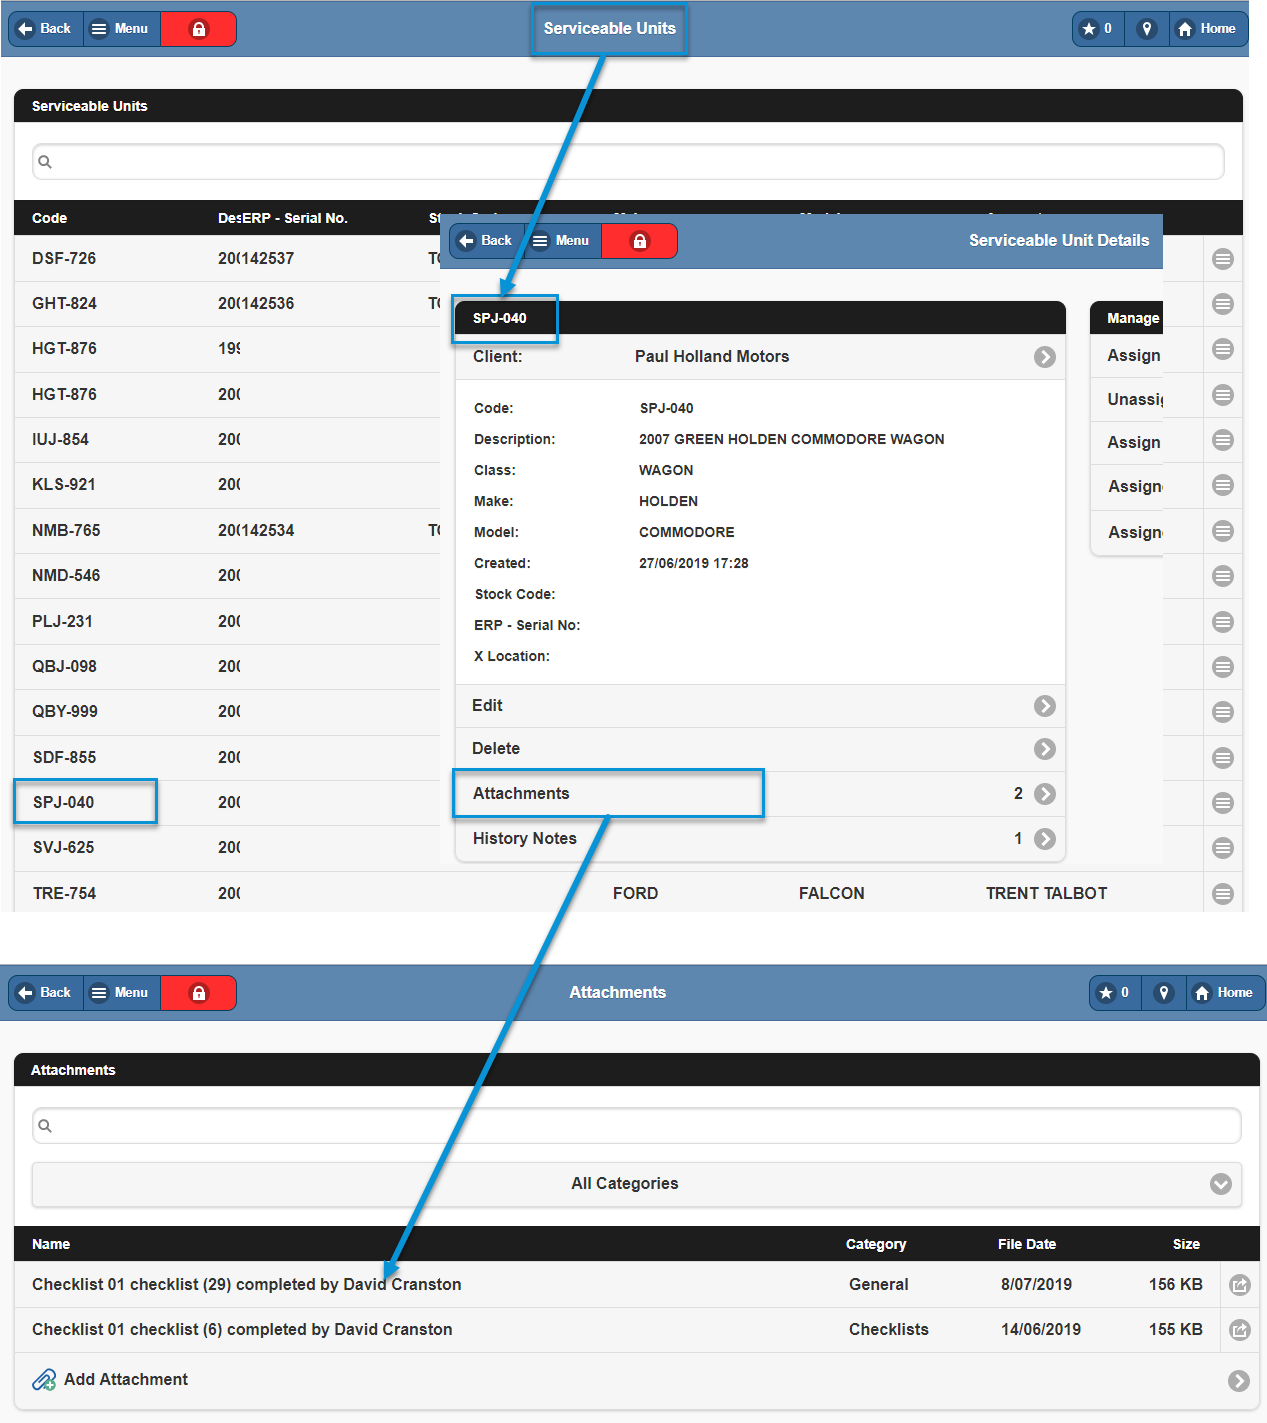
View Attachments in Serviceable Unit in Mobile or Professional. You are able to see checklist (pdf) as an attachment as per below.

In TimeTrak 19.1, the only serviceable unit date that was available on the main form was the created date. In TimeTrak 19.2, all standard serviceable unit date fields have been added to the main form as per below.
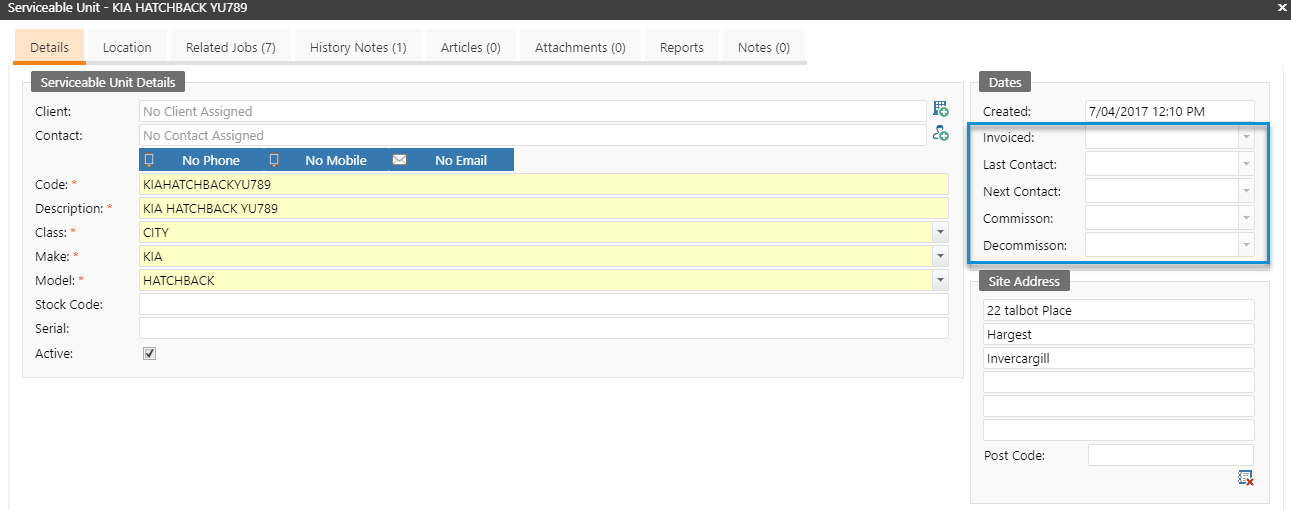
What fields are visible for serviceable units can now also be defined in profile level, in form layout as per below:

This provides the ability to make certain fields which may be critical to your business “read only” for certain users. It also allows customers to hide certain fields that do not apply to the way they use serviceable units. I.e: Stock code and Serial for clients who do not relate their serviceable units to items sold via Exo.
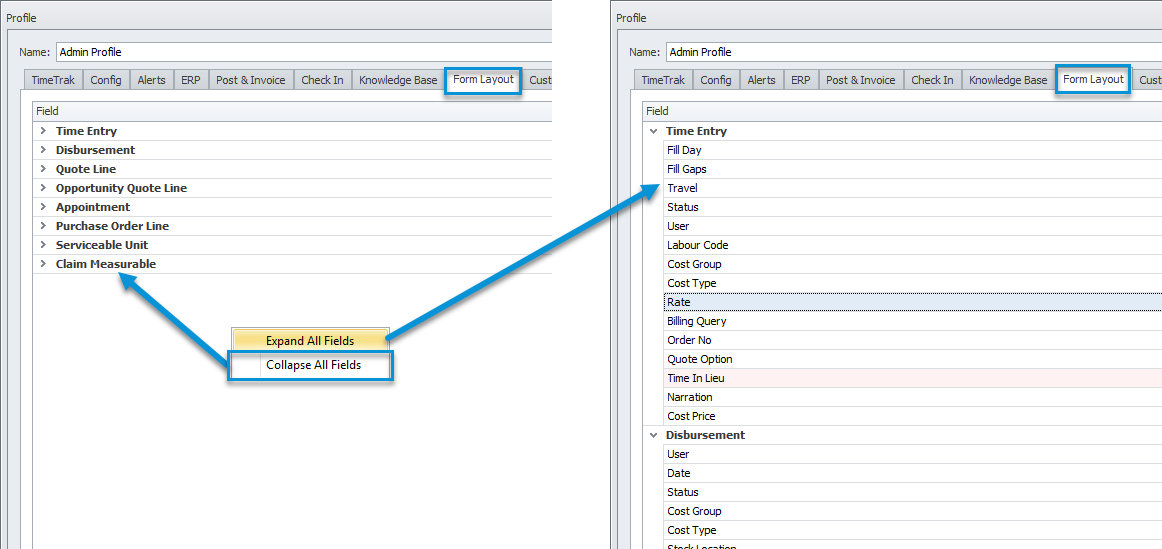
In TimeTrak 19.2, Form Layout in Profiles featured with Expand and Collapse field option. This setting can be enabled by simply right clicking on the Form Layout screen as per below.
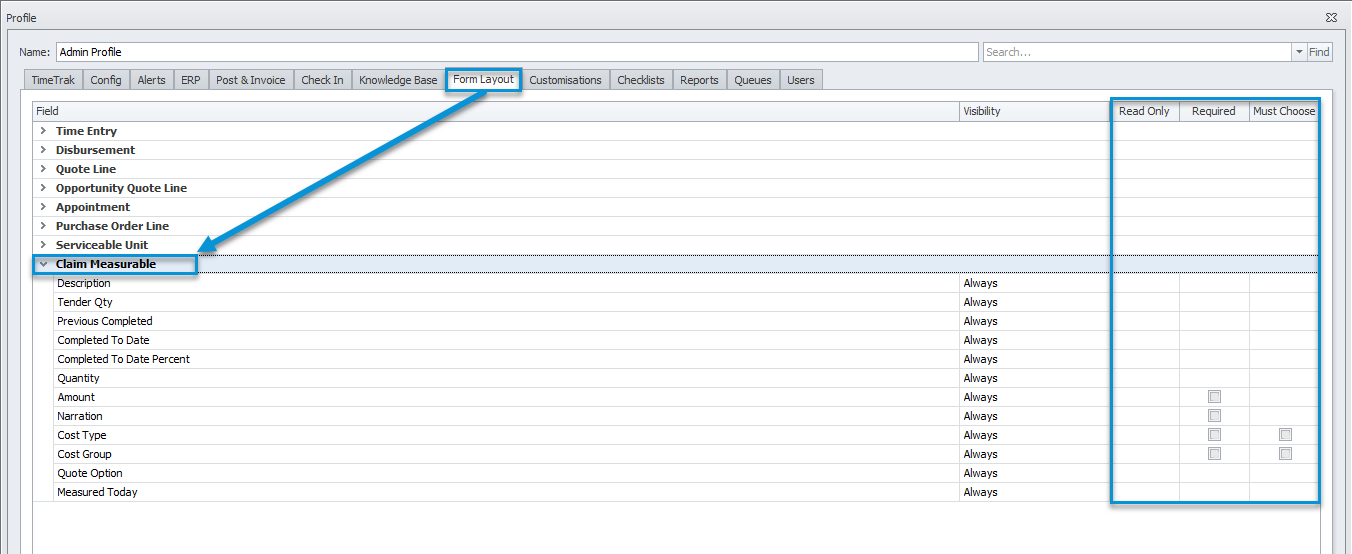
Claim Measurable settings are now available in Profile-Form Layout in TimeTrak 19.2 version. This option provides the ability to control the visibility of fields and enforce mandatory information in claim measurable in TimeTrak. Settings can be configured as per below.
12. Roster information in New Time Entry and Appointment
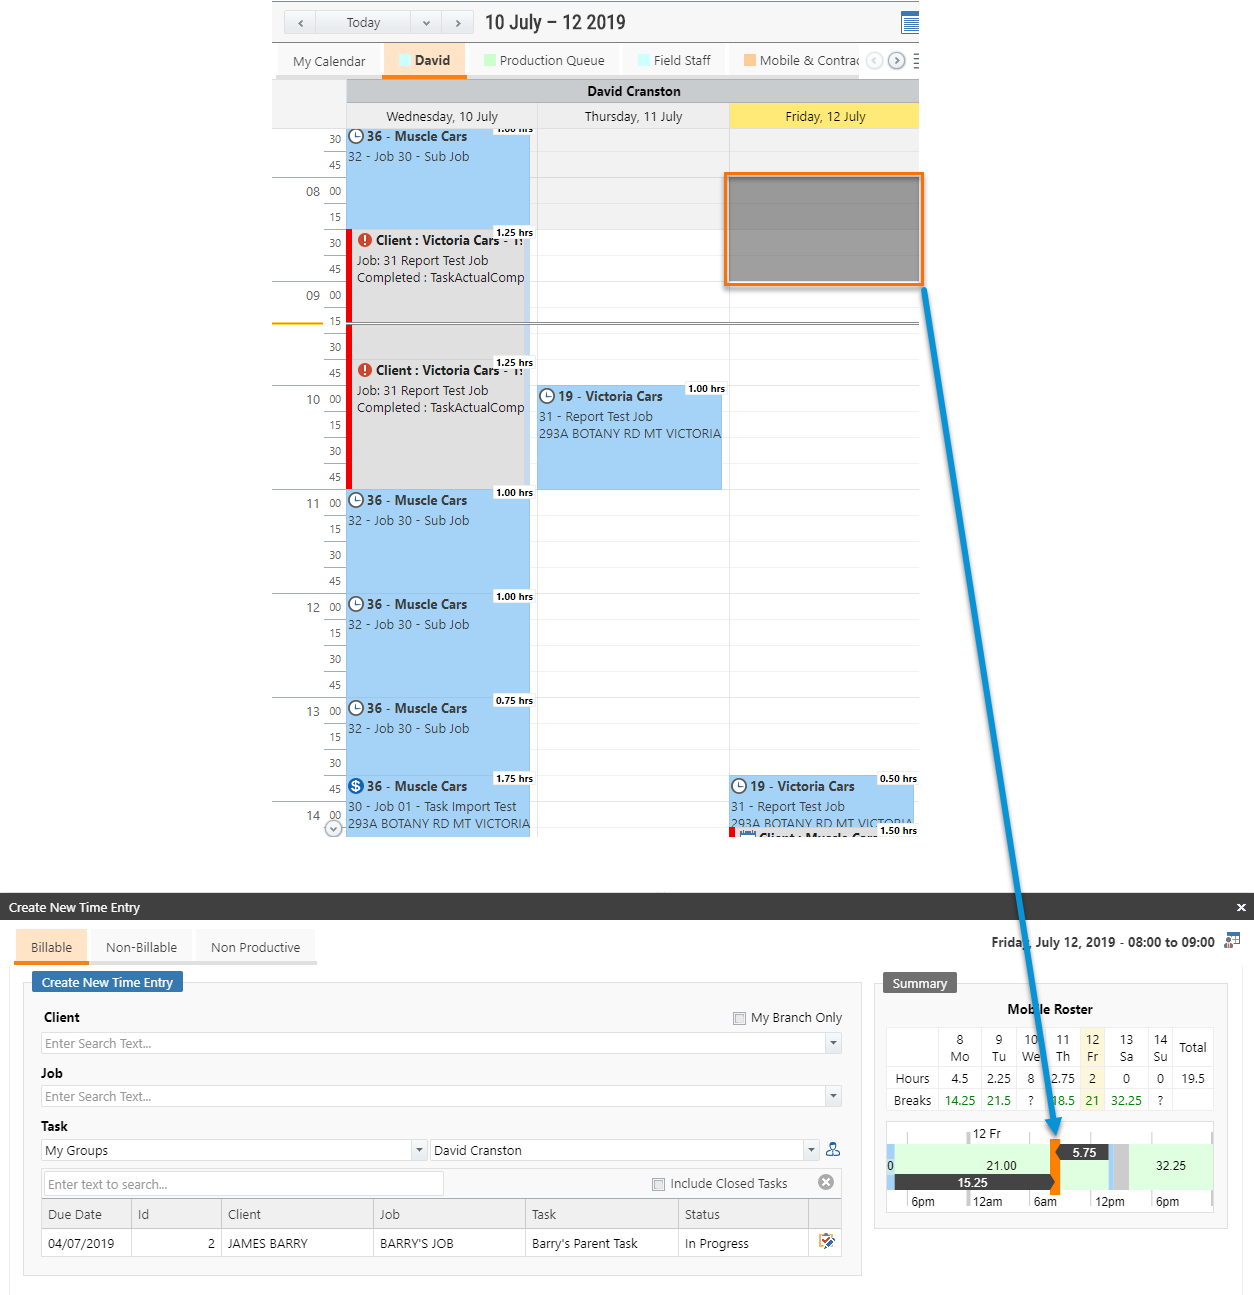
In TimeTrak 19.2, you are now able to see resource roster Information graphically at the time of adding a new time entry or appointment.
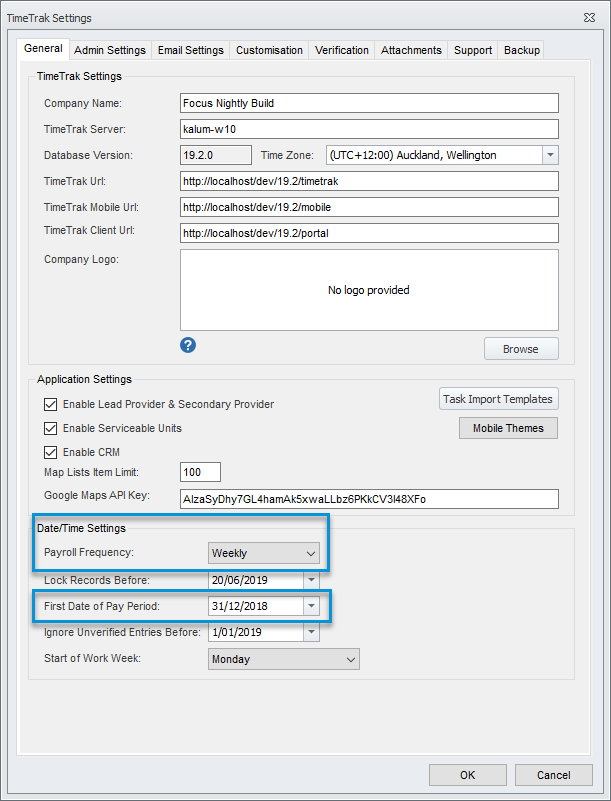
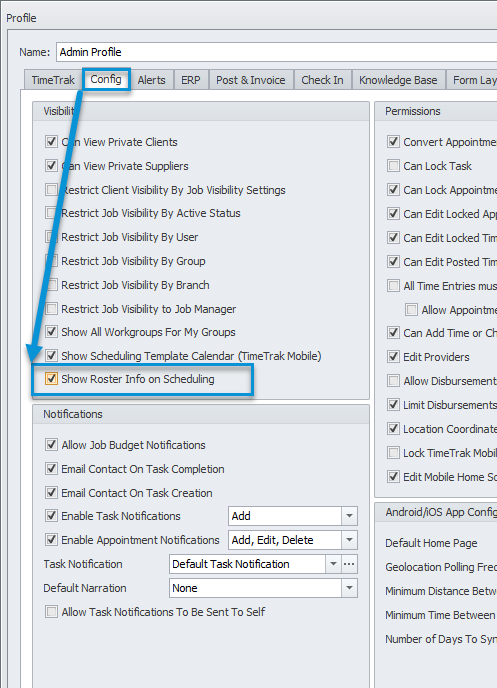
These settings can be configured in TimeTrak Admin Console, based on the first date of the pay period in TimeTrak General Settings and Config settings in Profiles as per below.
Once the above settings are enabled, graphical representation of the roster will be visible in new appointment and time entry forms. The current time slot is always visible in orange.
Below describes details of a Mobile user’s roster table information and colour codes.
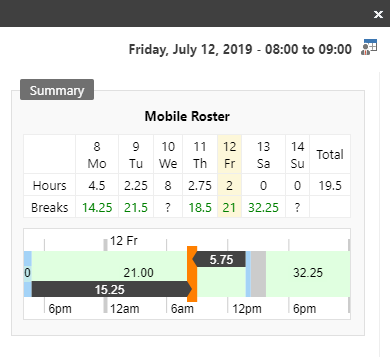
Roster Table
- Hours indicate total hours allocated for appointments and/or time entries.
- Breaks indicate available time.
Roster Colour Bar
- Orange Bar represents current Appointment or Time Entry.
- Light Blue Bars represent appointments.
- Light grey bar represents Time Entry.
- Dark grey arrows represent the time between previous and next appointment or time entry.
- Green background represents total available time in the roster.
This new feature provides an ability to view other users’ roster details when adding an appointment. Hover over any user to view roster information as per below.

13. Changes in task import process to allow for parent tasks where the estimated time is the total from subtasks
As part of a large project, there can be many tasks that need to be created, these tasks can be imported via an excel spreadsheet.
Click here for more details on the task import process.
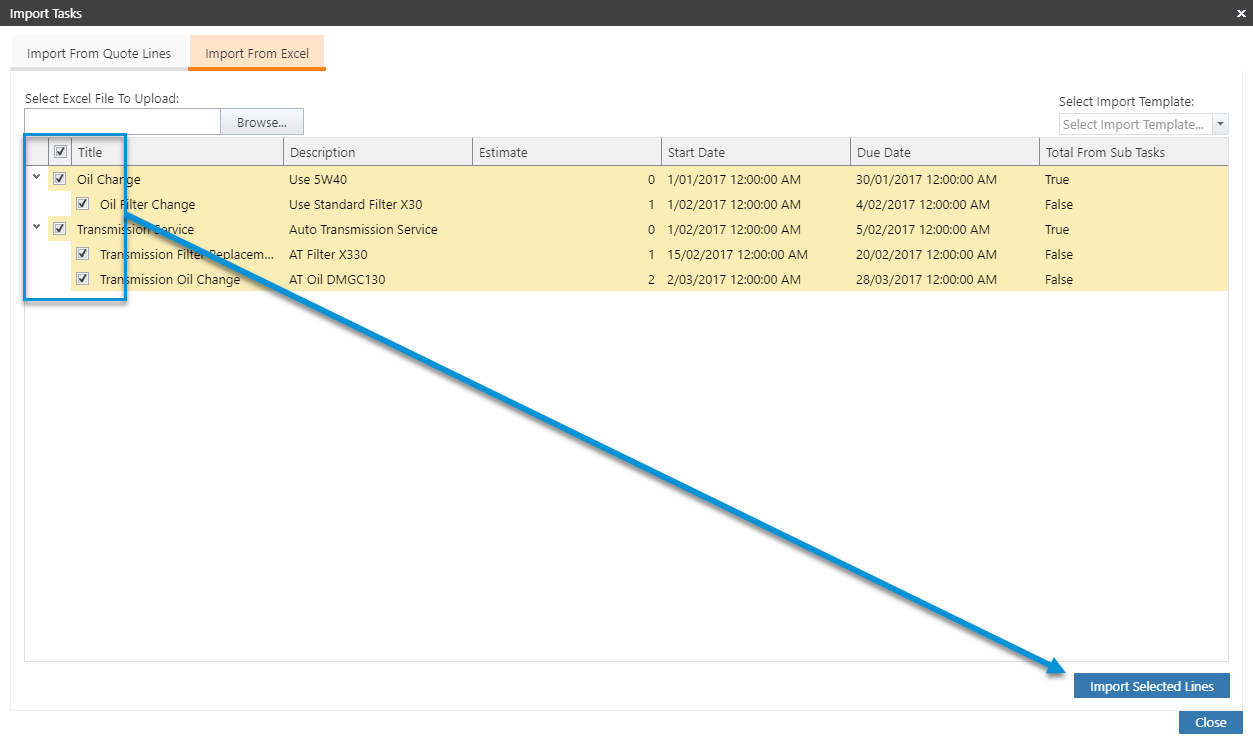
Adding to this, in TimeTrak 19.2 has an ability to import Tasks and Sub Tasks with or without estimated time totals added to the parent task. This setting is specified in Excel Template as per below.
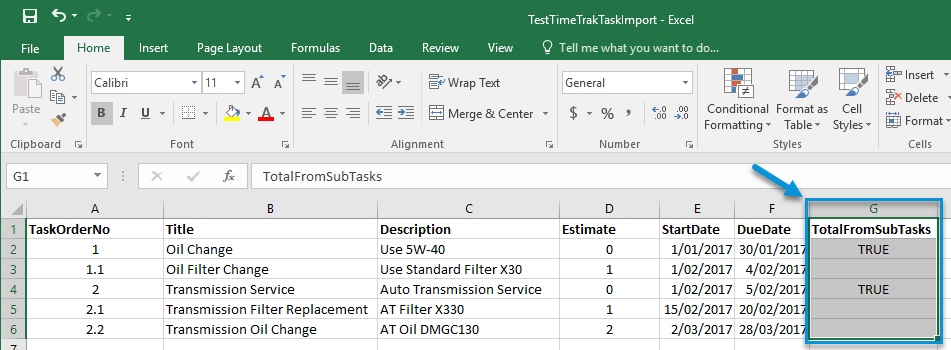
This will import the selected lines into TimeTrak as tasks and subtasks.

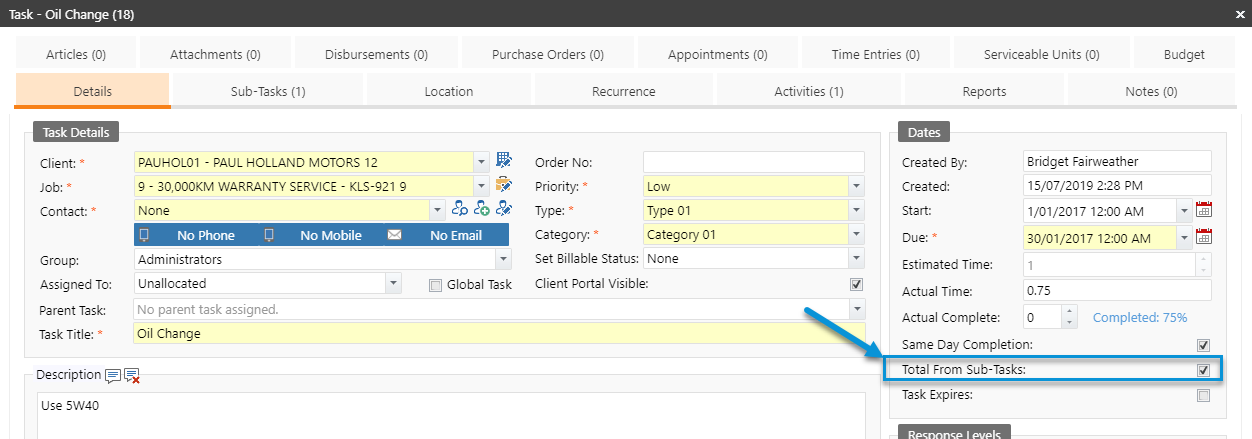
Open up a task that had total from subtasks set to true in the excel file. Total from subtasks link is checked as it should be.
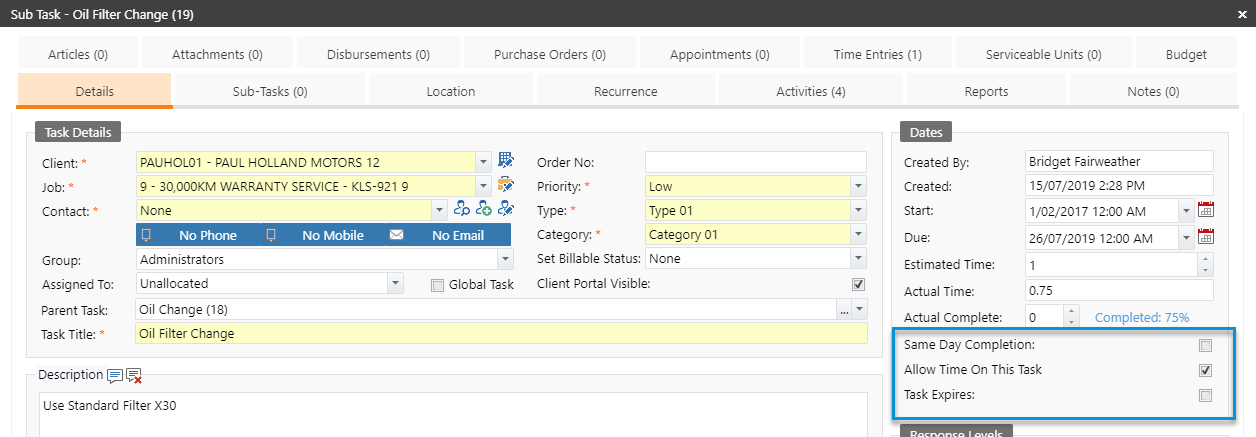
On the subtask, total from subtasks is not checked or visible as it was set to false.
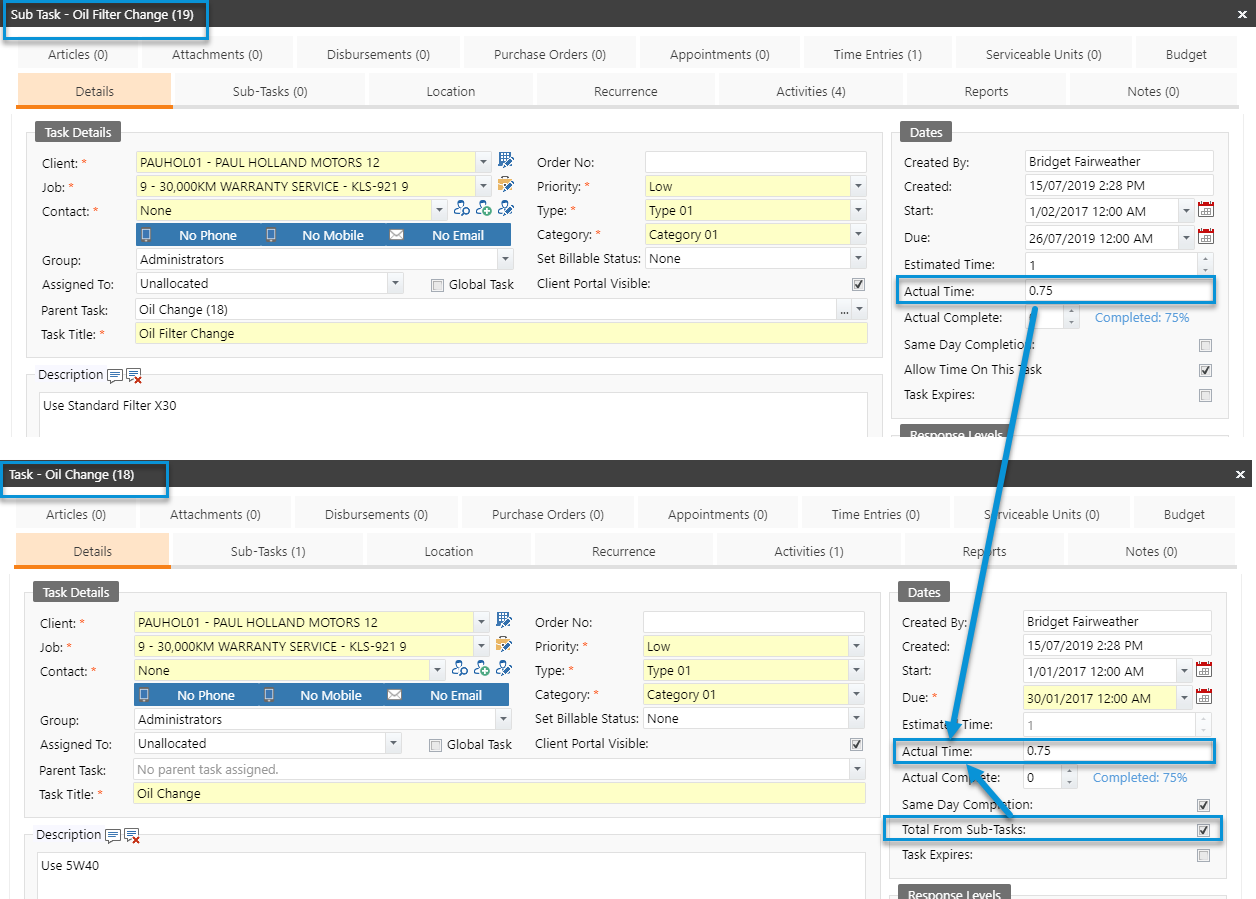
When time entries are added, Total Actual Time of parent task will appear as per below.
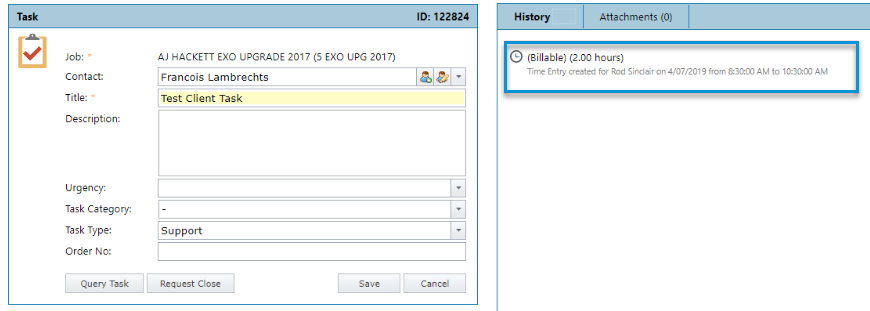
14. Time entry data visibility in the portal based on the billable status
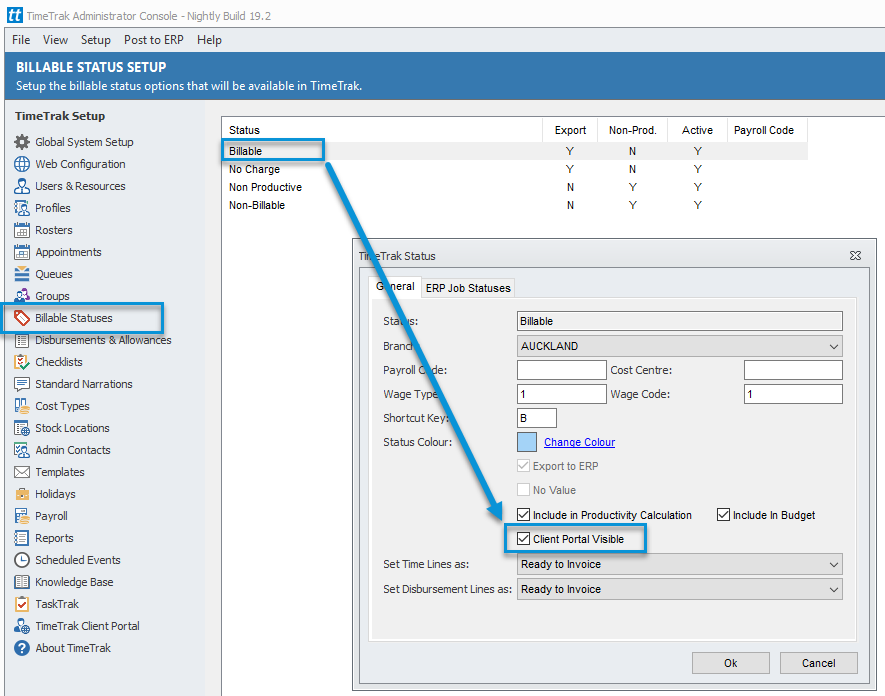
TimeTrak 19.2 has an ability to define if time entry data is available in the TimeTrak Portal based on the billable status.
This option provides an ability to restrict the visibility of other non-billable time entries such as training and write off in the portal.
Enable the “Client Portal Visible” option in Billable Status as per below to make time entries against the status visible in the portal.
15. Scheduled Posting in TimeTrak
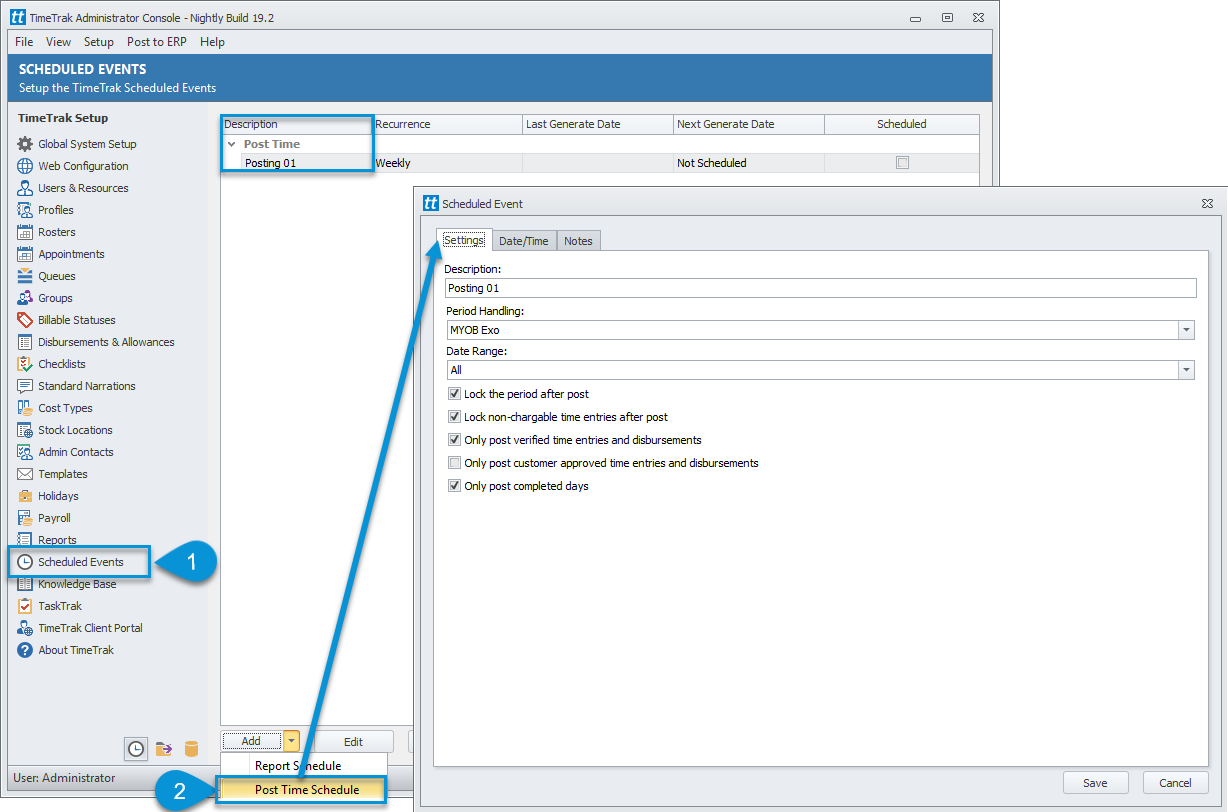
TimeTrak 19.2 has the ability to schedule automatic posting of time entries based on daily, weekly, monthly., every few minutes or run once. To activate this feature add, “Post Time Schedule” to Scheduled Events in TimeTrak Admin Console as per below.
Set recurrence type and Start date/time accordingly. Ensure Scheduled tickbox is enabled.
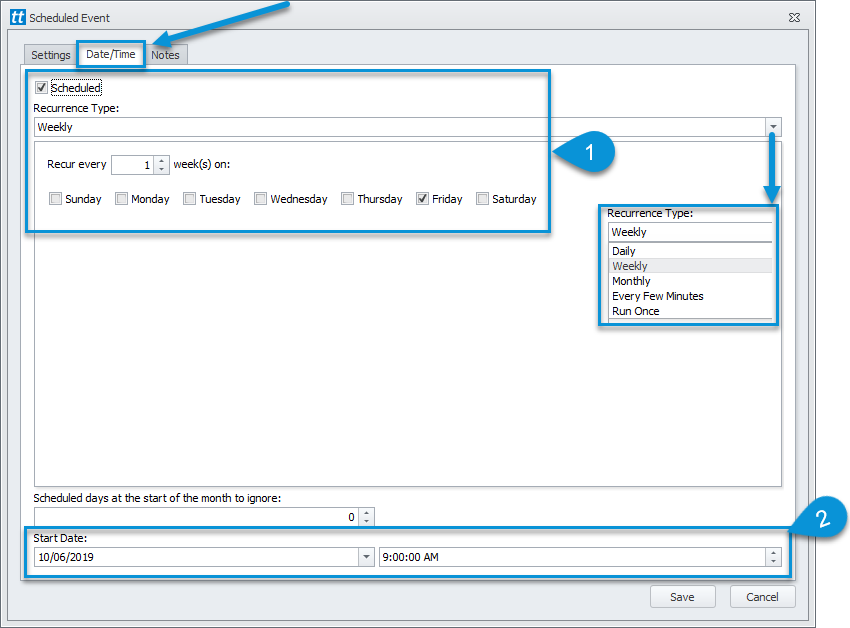
To test this schedule is working correctly, Right Click on the schedule and select Execute Schedule.

For more information on Scheduled posting see our whitepaper.